Well it's not bad once you are in wemos and wifi land... If you go for things like the puck.js or something with a lower power radio your should do much better - but yes - power may not be an issue.
Thanks for all the responses.....didn't expect so many replies. Initially the setup is for home; really its learning for an industrial application. But the industrial application is likely to use Weidmuller / Siemens kit; so no stress there.
Its the home application I'm bothered about. They are to be attached to central heating / thermal store pipes etc. Some are copper, some are plastic. I have the temp sensors from my Logo which are PT100's. I do want reliability, I currently collect the values every 5 secs.
Cheers,
Ant
Play is always good learning for work - I've built much of my career from that! ![]()
That seems a little excessive and you will certainly need to supply more power than a simple battery. Personally, I only collect data from my sensors every minute and that is more than sufficient for anything that isn't needing a sensitive real-time control system (like a chemical reaction). For a home environment, per minute readings are much easier to handle. My commercial Drayton Wiser smart heating system only reacts in about 30sec. Even at 1 minute intervals, I only keep 7d of data. Beyond that, I agregate to hourly with a max, min and avg point for each hour. I keep that for about 5 years. I could keep more now that I've moved to an old laptop as the server (rather than a Pi) but found I really don't ever use that extra data so it is pointless and it does add a memory overhead that is best avoided even with 8GB RAM to play with.
The DS18 sensor is easy to use and plenty accurate enough for the use you are talking about. Having the waterproof DS18B20 means that you won't need to worry about dealing with condensation on the sensor. But maybe get one(s) from a UK supplier with a good rep. rather than having to worry too much about cheap knock-off's. A D1-Minit + DS18B20 should still only cost a few pounds. Any old plastic container is enough to house it. Hopefully, you have a hot glue gun that will let you seal things enough to not have to worry where you put it. A decent 1A (or more if you like) USB power supply and a decent USB cable is needed for power (watch out for dirt-cheap USB cables, they can loose a lot of voltage making your platform unreliable). A cheap meter that will measure DC A and V, etc will be handy but not essential. A breadboard with some DuPont wires is always handy for temporarily wiring stuff together - though if you only want to do this, you won't need it as a DS18B20 comes with a decent wire. But watch out - this stuff is very addictive! Who knows where you will end up ![]()
Oh, and something to insulate around the outside of the sensor will help with accuracy - a lot. Especially on the plastic pipes, I wouldn't expect too much accuracy on those even then I don't think. Certainly, even with outer insulation, the thermal mass of the pipe will be enough that it will likely take a minute or two, perhaps longer, for temperature changes to be noticed. Not so much an issue with metal pipes as long as the pipe is insulated and the sensor is under that. If not (as with radiator pipes probably), it will be interesting to see the results, please do let us know.
Really good advice......I have installed the current sensors exactly what you have said; attached with foil tape and then wrapped in insulation.
Just for my sanity to make sure I get the right bits.....this is my purchase list; could you have a look to see if the list is ok and if I have missed anything out.
I assume the D1-minit was a typo and is a D1-mini? I have a multi meter & glue gun.
There seems to be loads of the D1-mini boards; is there one in particular I should look for?
I assume they are a USB mini B connection? I assume this will communicate between my laptop and the board to setup / flash the memory? If this is connected do I need the external power supply? To connect the power supply I assume I can use a usb cable and cut one end off and solder onto the board; then use a USB charger plug to power?
Cheers,
Ant
https://www.amazon.co.uk/DS18b20-Waterproof-Temperature-Sensors-Transducer/dp/B00CHEZ250
Looks good.
No special version of the d1 mini is required.
I'll have a bash...lets see what I can blow up! 
Personally I prefer the ones with metal cans for the chips, buts that's probably just me.
You will need an external power unit. These are the ones I use (although you can source them from loads of other suppliers).
https://cpc.farnell.com/pro-elec/pel00314/usb-charger-5v-1-2a-white/dp/PW04000?st=mains%205v%20usb%20charger
No need to cut the cable as the Wemos has a USB socket on the board.
I did suggest to you above to get the Wemos D1 Mini version 3 - which looks like you have.
When you come to soldering the pins onto the board I usually use the ones with the very long pins and solder them so the USB connector is on the underside of the board. This means the USB connector is sandwiched between the top of the board and the breadboard, and gives it some rigidity (for when you plug-in and pull-out the USB cable).


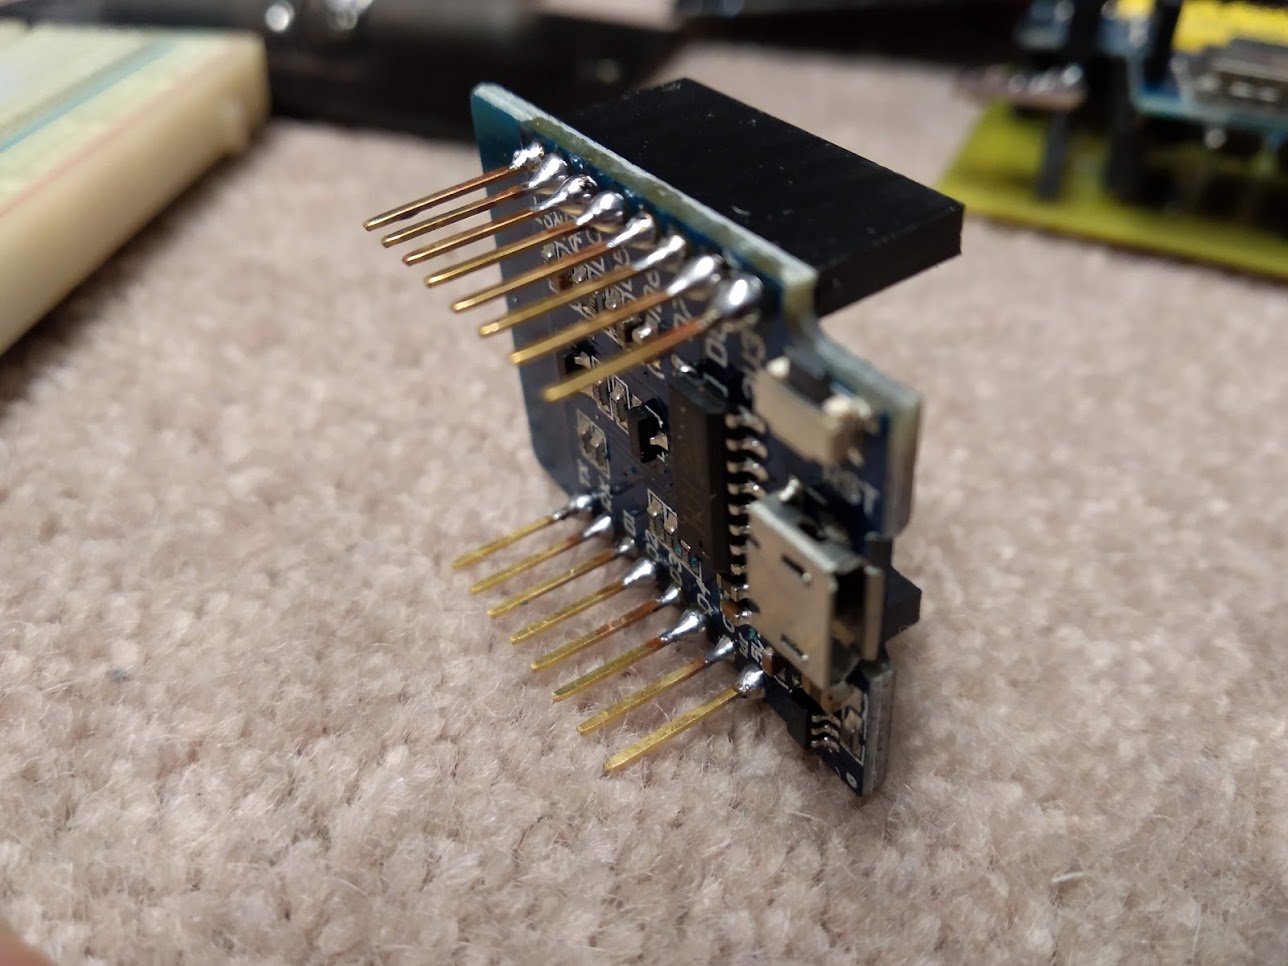
Don't throw away the short pins as you could solder the flying ends of the temperature sensor onto them and then use it to plug it in to a breadboard.
Here's a link to the latest ESP-Easy release. I haven't used Tasmota, but many people on the forum do, so if you decide to go down that path there are people here who I am sure will help you.
You need to scroll to the end of the above link and then select Assets.
Download the version labelled.. ESPEasy_ESP82xx_mega-20201227.zip (or later).
When you unzip the package you'll find the ESP.Easy.Flasher program (for a PC) which makes flashing a Wemos a breeze. Let me know when you have got this far so I can explain how to set-up yout DS18B20.
I've written loads of tutorials for my IoT students and probably have one that deals with temp sensors.
Here's a link to a write-up (not mine) on using a DS18B20 with a Wemos D1 Mini running ESP-Easy.
https://www.letscontrolit.com/wiki/index.php/Dallas_DS18b20
You didn't say what OS you have on your laptop.
Note: Some people on the forum (e.g. @zenofmud) program their Wemos modules using Apple devices.
Recently I've been using Platformio running on Visual Studio Code (with a built-in realtime syntax checker) to program some of my Wemos units in C++. Bit of a learning curve compared with ESP-Easy.
You might want to consider purchasing some breadboards and connecting wires, and maybe some LEDs and some resistors (330 ohm) as I'm sure you will become addicted.
I also use ESPeasy when I can't be bothered to put my own custom code on. Eventually, I generally end up with custom code though once I get fed up enough of any limitations of ESPeasy. Though I have to say, it has certainly got quite a bit better over the las year or so.
Here is an example of the MQTT topic structure I use with ESPeasy:

You can also see that the device above it in the list is running my custom code (actually an old version that I need to update).
I republish everything to a standard schema:

Haha, just noticed an error in that republished data - the protocol is "Custom" rather than ESPeasy.
Thanks for the comment, have you an example unit / version....it helps to know someone else has purchased the same unit and has worked as expected.
Cheers,
Ant
Hi
I just received a couple of these - WeMos D1 Mini Arduino Compatible ESP8266 ESP12 Development board, UK SELLER | eBay
Seem to work fine so far... (Note it probably isn't the v3 version folk are using - but... )
I have a public gist up here - Wemos temperature monitor · GitHub that uses the platformio dev tool (but should also work with arduino ide)
This has a couple of ds1820 reading routines in as I needed work out the specific addresses of several sensors - and then read them specifically so if one didn't report for some reason then the readings still were reported on the correct property.
It also uses deepsleep which requires tying the pin D0 to RST pin - but only after programming - in my case I just unplugged the add-on board I used for the sensors that also contained the link.
I think that Dave means something like this Geekcreit version of the d1 mini:
Phew, the prices have certainly jumped massively. Rather expected that with Brexit I'm afraid.
Interesting that Wemos themselves (the original vendors of the d1 mini) no longer make a version with the shielded ESP8266 chip. The one above is a v2.2 board.
Any idea what the difference is between the v2 & v3 versions? Might just order one of each.
I think the main difference is v2 has a metal case whereas v3 is plastic (non-metal). AliExpress have good prices (£1.36 / £1.52) on both versions at the moment. Either version will work fine for your application.

Nice - is the case a 3d print ? available online ?
I printed it myself (I have an Ender 3 Pro). It is this design from thingiverse. I haven't seen it available ready made.
I did have to cut the hole in the side for the sensor, I plan to do a remix of the design with the hole in, in order to avoid that.
The sensor is soldered direct to ribbon cable with heat shrink on the legs, then another heat shrink on the outside to protect it. It would be better with white heat shrink, but I haven't got any. The wires and pullup are soldered direct to the header holes in the board.
I used DIY code using the Arduino IDE rather than Tasmota or similar, I think with something so simple it is easier to DIY. The code includes wifi, mqtt, 1-wire reads and OTA update code in 187 lines of code.
The arduino MQTT library used was written by a well known contributor here.
Don't you have black PLA? ![]()