@seth350, lots of issues. That is your disadvantage now, when doing pioneer work ...
Ah yes, the widget API is only recently added to dashboard version 2.10.0. Would be good if you could add that to the readme page, in the installation section.
Well seems you have already analysed it very well.
Seems indeed that you need to specify (in your raw html section in your js file) a dynamic id, similar to the gauge node:
<div id="gauge_{{$id}}" ...
Not sure at the moment where the $id is coming from, and if you have to specifiy it somewhere
[EXTRA] Another thing that might be usefull is theming support. When you look e.g. at the gauge-node, they get the settings of the current theme and display the gauge in those colors (if available):
@dceejay : I'm not sure whether every widget developer needs to add this kind of code, or whether this will/can be applied automatically for all widget nodes by the dashboard???
Good question. Normally you add a dependency to your contribution, which downloads automatically the library you need underneath. However in this case, the dashboard is calling the widget contribution (not the other way around) as a parent. The widget is being loaded by an existing application. So I don't think it is possible, but I can be completely mistaken ...
That is because the ui_gauge is built in so can get to the RED object using a relative path - whereas adding external nodes need to use the RED.require call to be given the instance instead.
Re theme - well you can certainly use the getTheme() call to get the current theme - hopefully it should always return something rather than you have to default everything... but yes - once you have that you can use the various parts to colour your widget appropriately.
Re {{$id}} - that should come from the individual scope of each widget I think... (haven't looked for a while - hopefully may get some time over the holidays...)
and yes @seth350 - you are on (or just over) the bleeding edge. One of our tasks for next year is to set up a ui nodes project to hold some of the basic examples and docs - so any thoughts / docs / notes you can come up with would be appreciated by those who follow.
Thank you dceejay.
I will document what I can in case it’s of any help.
I had found the {{$id}} last night but did not get to dig into it. I feel like it is also tied into the “order” attribute as well.
The built in widgets increment their order as they are added to the dashboard, but are instantiated as “0” within the node. Something else is changing the attribute.
It may be just as easy to duplicate the ui_template node and use it as the boiler plate when building our own widgets. It seems to have all the functionality we would need built in, except for the ability to configure different options in the node-red admin. That should just be changing the ui_template nodes .html file.
I may do some testing with that sometime after the holidays.
In the mean time, I hope everyone has a wonderful holiday and thank you for all your help. I really appreciate it.
I did manage to find some clues to how to individualize each ui widget.
Digging around the source code I found this nugget.
scope.$watch('me.item.gtype', function() {
                        if (unregtype) { unregtype(); }
                        // Wave type gauge
                        if (scope.$eval('me.item.gtype') === 'wave') {
                            document.getElementById("gauge_"+scope.$eval('$id')).innerHTML = '<svg id="gauge'+scope.$eval("$id")+'" style="width:100%; height:100%;"></svg>';
So it seems that scope.$eval('$id') is what determines or finds the individual widget.
However, I have yet been able to find where the functions are for scope. Seems I have looked through every .js file under node-red-dashboard's git.
I can only find where scope is being passed as a parameter, and I do believe that scope is referring to the current object/widget being updated/created.
Some moments later...
Some research tells me that scope is actually part of angular and scope.$eval is a function within angular to allow the user to pass an expression.
Armed with this knowledge, I think I see now how you guys are interacting with the widgets on an individual basis.
Correct me if I am wrong please, for I am just a simple dabbler-in-Java-Query-Script...
Each time a widget is called to update, a scope is referenced for that update. The particular update instance has a unique ID. $scope.$id
You then use that $id and set the widget's id in the html. I.E., <div id=widget_'+$id>.
Once that is done, you can then reference that particular widget using the widget_$id and apply CSS changes and other changes to it's children using jQuery.
I witnessed this when I added a standard gauge widget to the dashboard.
The <div id for the gauge started out as <div id='gauge_206'> and as the breakpoints hit, the id would increment by some margin. Right now it is at <div id='gauge_496'>
Hey @set350, welcome back. Hope you had a nice Christmas.
I saw you had published your widget on npm, so I thought you had already figured it al out
I only use AngularJS when I have to do something in the dashboard, so don't know much about it.
The dashboard is build in AngularJs (wich is build in Javascript unlike Angular which is build in Typescript).
The AngularJs scope is a JavaScript object which contains both properties and methods, and is used for (2 way) data binding between the (html) view and the Angular controller.
There can be multiple scope objects in an AngularJs application. When AngularJs scans the DOM tree and finds ng-app, the root scope object ($rootScope) will be created. And every time an ng-controller is found, a separate child scope object will be created under the root scope. This is nicely summarized on Stackoverflow:
Each of those scope objects has its own unique identifier ($id) which is incremented automatically.
On this Stackoverflow link there is another picture of how the 3 parts work together:
But I don't know how this is setup in the Node-RED dashboard (how many controllers ...). I'm afraid I cannot help you further with this ...
Thanks Bart for the helpful illustrations. That makes more sense now.
In that perspective, I was almost correct in what the id is.
Instead, each widget is added into the rootscope and each widget can be accessed by its unique scope $id.
I still don’t know why the widget id would increment after every passing breakpoint?
Maybe the controller gets reloaded after a breakpoint?
I’m going to do some more research and looking over the current dashboard nodes.
From this explanation I understand that {{$id}} is a template expression, which is evaluated by AngularJs and converted to a string value. And it can indeed be evaluated, since $id() seems to be an AngularJs built-in function:
As a result when you do scope.$eval('$id') or {{$id}}, I assume that nextUid() function is executed and the id is incremented. Does this makes sense and can you test that? Although then I don't get this example, where you can do $scope.id = 0
This alone will give the id a unique id just like the other standard dashboard nodes have.
Each time you deploy a change that causes the dashboard to reload, a new $id will be assigned where you place {{$id}}.
In order to do the cool stuff like change html or properties, you can do it like so: var ptr = document.getElementById("lgPtr_"+scope.$eval('$id'))
You can then reference the object elsewhere with jQuery.
Note that I tried the following and it did not work: $("#lgPtr_{{$id}}") $("#lgPtr_"+scope.$eval('$id')
Next thing is to tie this all together. I will most likely have to revert to inline styling for the scale areas instead of using CSS, and also for the other elements. I will need to also do some testing with passing the default values into the initController. It seems that config is not available in there.
Thank you again for all the support. It would not be possible without this community!
I have only tested within the (function(scope) in the ui_template. My guess is that it should function the same in the widget's initController. As that is where the code resides now in the linear gauge widget.
I.E., here
initController: function($scope, events) {
                    debugger;
                    $scope.flag = true;
                    $scope.$watch('msg', function(msg) {
                        var input = msg.payload
                        var maxRange = msg.highlimit
                        var minRange = msg.lowlimit
                        var minScale = 0
                        var maxScale = 188 //this is the length of the gauge
                        var setP = msg.setpoint
............
I hope it turns out as well as I'd like it to. I know I will personally make good use of it. I have 20+ lined up across my dashboard in ui_templates. Making changes takes a bit of time.
Getting this into a parameterized widget will be really nice!
Finally got to do some testing in the actual widget and it was unsuccessful.
.......at first!
What I have found is that there are two different scope.
One is $scope and the other is scope.
Either one will return a different $id. In the case of creating a ui node, you must use $scope.$eval('$id') to reference an $id in the HTML.
A screenshot of what it looks like now.
Much better! Now the pointers are acting independently of one another.
Next is to address the colors...
Getting rid of the CSS and placing the styling inline like so:
My problem is getting the limits and setpoint values into the initController.
For now I am removing them and only allowing those values to be passed in by a msg.
Thanks for all the help!
Github and npm are now updated with the latest working version.
Cool! The code is very compact, so very useful for developers to start from it...
I have deleted my linear-gauge repository on Github.
A few remarks, in case you have some time left somewhere.
I had already had a look at them, but without success. Hopefully @dceejay or @nisiyama or any other great mind can assis you further...
You have some debugger;statements in your code. Better to remove those, because not everybody (who has his debugger open) wants to break at all those locations.
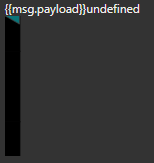
When I drag a new lineargauge node into my flow editor, I immediately get an error indication (red circle):
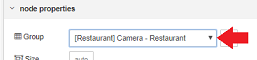
And when I open the node's config screen and click 'Done', then the error is gone (although I haven't changed anything). I assume it has do something with the 'group' field, which is required but is undefined when you open the config screen. I have checked this by adding a debugger statement in the other validation function:
I don't really get why it is undefined, because it is displayed when my screen is opened:
And when I click the 'Done' button, the validator functions run again, and now the group is indeed filled (and of course valid):
No idea why the group is only specified after the config screen has been opened, because there is even no initialization code in the oneditprepare function .
When you don't inject a message at startup, the labels look a bit weird:
I have tried to get the limits and setpoint values into the initController, but I also couldn't accomplish that . I have no clue whether the config data is available here somewhere at the client side at this moment ... It would be very useful to have the config here.
That is true of all UI nodes. They need to be assigned to a group to get displayed.
When you open the edit dialog, if the group is undefined it picks the first in the list. That is the same behaviour with all other config nodes - such as the mqtt/mqtt-broker nodes.
Doh!
I was so happy to have got it working I missed the debuggers.
I will add some more code to check for empty payloads and limits.
We can also go back and comment all of the required/boiler-plate code.
We could even make a very simple node for everyone to begin with. A text node that allows the user to configure the size and color maybe? Attach a tutorial in the package that is downloaded when the user installs from npm?
I have an open task to create a repository on GitHub under the Node-RED organisation for us to maintain extra UI nodes. That repo would be a good place to host a great worked example node and to ensure its readme has good docs for creating these nodes.
If you wanted to collaborate on that, given what you've learnt with this node, that would be most welcome.


 .
.