One of my IoT students was asking how to control a set of LEDs on a Wemos D1 Mini, that had been programmed using Arduino code, via MQTT commands from Node-RED.
This is what the breadboard lash-up looks like...

The red LED is connected to D8 (GPIO-15).
The green LED is connected to D7 (GPIO-13)
The yellow LED is connected to D6 (GPIO-12)
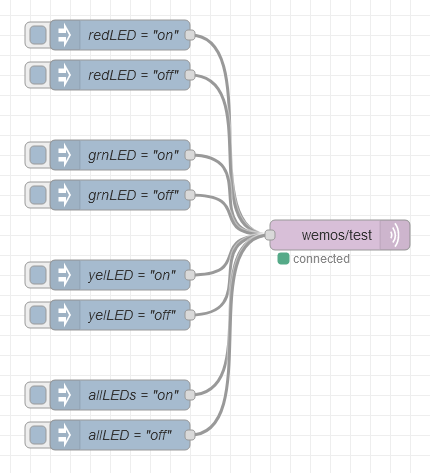
This is the very simple test-flow we created in Node-RED.
[{"id":"bb2bbcc236726f09","type":"tab","label":"Wemos Controller","disabled":false,"info":"","env":[]},{"id":"a88767b42282a67e","type":"inject","z":"bb2bbcc236726f09","name":"redLED = \"on\" ","props":[{"p":"payload.state","v":"on","vt":"str"},{"p":"payload.color","v":"red","vt":"str"}],"repeat":"","crontab":"","once":false,"onceDelay":0.1,"topic":"","x":230,"y":260,"wires":[["de011f97521ea82a"]]},{"id":"de011f97521ea82a","type":"mqtt out","z":"bb2bbcc236726f09","name":"","topic":"wemos/test","qos":"","retain":"","respTopic":"","contentType":"","userProps":"","correl":"","expiry":"","broker":"b80c36f2.044588","x":450,"y":460,"wires":[]},{"id":"d7aff05bf89bba23","type":"inject","z":"bb2bbcc236726f09","name":"redLED = \"off\" ","props":[{"p":"payload.state","v":"off","vt":"str"},{"p":"payload.color","v":"red","vt":"str"}],"repeat":"","crontab":"","once":false,"onceDelay":0.1,"topic":"","x":230,"y":300,"wires":[["de011f97521ea82a"]]},{"id":"1ef4446fccad4b63","type":"inject","z":"bb2bbcc236726f09","name":"grnLED = \"on\" ","props":[{"p":"payload.state","v":"on","vt":"str"},{"p":"payload.color","v":"green","vt":"str"}],"repeat":"","crontab":"","once":false,"onceDelay":0.1,"topic":"","x":230,"y":380,"wires":[["de011f97521ea82a"]]},{"id":"d38f12d896cc2eee","type":"inject","z":"bb2bbcc236726f09","name":"grnED = \"off\" ","props":[{"p":"payload.state","v":"off","vt":"str"},{"p":"payload.color","v":"green","vt":"str"}],"repeat":"","crontab":"","once":false,"onceDelay":0.1,"topic":"","x":230,"y":420,"wires":[["de011f97521ea82a"]]},{"id":"d03d94b53eaa94d9","type":"inject","z":"bb2bbcc236726f09","name":"yelED = \"on\" ","props":[{"p":"payload.state","v":"on","vt":"str"},{"p":"payload.color","v":"yellow","vt":"str"}],"repeat":"","crontab":"","once":false,"onceDelay":0.1,"topic":"","x":230,"y":500,"wires":[["de011f97521ea82a"]]},{"id":"e5d4bc03aa7bec28","type":"inject","z":"bb2bbcc236726f09","name":"yelLED = \"off\" ","props":[{"p":"payload.state","v":"off","vt":"str"},{"p":"payload.color","v":"yellow","vt":"str"}],"repeat":"","crontab":"","once":false,"onceDelay":0.1,"topic":"","x":230,"y":540,"wires":[["de011f97521ea82a"]]},{"id":"087bd5bce959a671","type":"inject","z":"bb2bbcc236726f09","name":"allLEDs = \"on\" ","props":[{"p":"payload.state","v":"on","vt":"str"},{"p":"payload.color","v":"all","vt":"str"}],"repeat":"","crontab":"","once":false,"onceDelay":0.1,"topic":"","x":230,"y":620,"wires":[["de011f97521ea82a"]]},{"id":"a2773f1bbca9f31c","type":"inject","z":"bb2bbcc236726f09","name":"allLED = \"off\" ","props":[{"p":"payload.state","v":"off","vt":"str"},{"p":"payload.color","v":"all","vt":"str"}],"repeat":"","crontab":"","once":false,"onceDelay":0.1,"topic":"","x":230,"y":660,"wires":[["de011f97521ea82a"]]},{"id":"b80c36f2.044588","type":"mqtt-broker","name":"Broker_156","broker":"192.168.1.156","port":"1883","clientid":"","autoConnect":true,"usetls":false,"protocolVersion":"4","keepalive":"120","cleansession":true,"birthTopic":"","birthQos":"0","birthPayload":"","birthMsg":{},"closeTopic":"","closePayload":"","closeMsg":{},"willTopic":"","willQos":"0","willPayload":"","willMsg":{},"sessionExpiry":""}]
Basically, a command is sent (from Node-RED) via MQTT to the Wemos with this format...
"color": "red" or "green" or "yellow" or "all"
"state": "on" or "off"
Together we worked out these Arduino files that need to go in the Wemos. You will need to place them in a folder, with the same name as the .ino file, so Arduino can compile them correctly.
Most of the clever stuff is performed in the function...
void callback(char *mqtt_topic, byte *message, unsigned int length)
You will need to enter your WiFi credentials in the 'config.h' file.
You will also need to install these Arduino libraries...
- PubSubClient
- ArduinoJson
My student and I hope you find this write-up useful?