Examples of Colour change button and switch

A simple example of a button that has two states and changes colour/text and icon based on those two states

[{"id":"b9a70965.13e138","type":"ui_button","z":"d511095d.512808","name":"","group":"c070ecdb.6d5ce","order":0,"width":"0","height":"0","passthru":false,"label":"{{payload}}","color":"","bgcolor":"{{colour}}","icon":"","payload":"press","payloadType":"str","topic":"","x":590,"y":615,"wires":[["48aaee20.8d9e1"]]},{"id":"5cc84101.ac6d9","type":"change","z":"d511095d.512808","name":"","rules":[{"t":"set","p":"colour","pt":"msg","to":"green","tot":"str"},{"t":"set","p":"payload","pt":"msg","to":"<i class=\"fa fa-rotate-90 fa-folder-open-o\"></i> OPEN","tot":"str"}],"action":"","property":"","from":"","to":"","reg":false,"x":410,"y":570,"wires":[["b9a70965.13e138"]]},{"id":"329e773b.0fdcb8","type":"inject","z":"d511095d.512808","name":"","topic":"","payload":"","payloadType":"str","repeat":"","crontab":"","once":true,"onceDelay":"","x":215,"y":570,"wires":[["bc5a70e.6f6a29"]]},{"id":"48aaee20.8d9e1","type":"function","z":"d511095d.512808","name":"state","func":"var state = context.state || false;\nstate = !state;\ncontext.state = state;\nif (state) { return [msg,null]; }\nelse { return [null,msg]; }\n","outputs":2,"noerr":0,"x":215,"y":615,"wires":[["5cc84101.ac6d9"],["bc5a70e.6f6a29"]]},{"id":"bc5a70e.6f6a29","type":"change","z":"d511095d.512808","name":"","rules":[{"t":"set","p":"colour","pt":"msg","to":"red","tot":"str"},{"t":"set","p":"payload","pt":"msg","to":"<i class=\"fa fa-rotate-90 fa-folder-o\"></i> Closed","tot":"str"}],"action":"","property":"","from":"","to":"","reg":false,"x":410,"y":615,"wires":[["b9a70965.13e138"]]},{"id":"c070ecdb.6d5ce","type":"ui_group","z":"d511095d.512808","name":"Click","tab":"7d974e73.cf8f9","order":1,"disp":true,"width":"5"},{"id":"7d974e73.cf8f9","type":"ui_tab","z":"d511095d.512808","name":"Home","icon":"link","order":1}]

And similarly for the switch widget

[{"id":"e5b337f.ddf04c8","type":"inject","z":"d511095d.512808","name":"","topic":"","payload":"false","payloadType":"bool","repeat":"","crontab":"","once":true,"onceDelay":"","x":200,"y":705,"wires":[["dcbbf896.32fb28"]]},{"id":"695a1cfd.452994","type":"ui_switch","z":"d511095d.512808","name":"","label":"{{label}}","group":"ccbdd82d.3c19b8","order":0,"width":0,"height":0,"passthru":false,"decouple":"true","topic":"","style":"","onvalue":"true","onvalueType":"bool","onicon":"fa-sun-o","oncolor":"red","offvalue":"false","offvalueType":"bool","officon":"fa-cloud","offcolor":"grey","x":590,"y":705,"wires":[["7926b21b.c61b6c"]]},{"id":"7926b21b.c61b6c","type":"delay","z":"d511095d.512808","name":"","pauseType":"delay","timeout":"2","timeoutUnits":"seconds","rate":"1","nbRateUnits":"1","rateUnits":"second","randomFirst":"1","randomLast":"5","randomUnits":"seconds","drop":false,"x":600,"y":750,"wires":[["b797b90b.f62108"]]},{"id":"dcbbf896.32fb28","type":"change","z":"d511095d.512808","name":"","rules":[{"t":"set","p":"label","pt":"msg","to":"click for on","tot":"str"}],"action":"","property":"","from":"","to":"","reg":false,"x":400,"y":750,"wires":[["695a1cfd.452994"]]},{"id":"b797b90b.f62108","type":"switch","z":"d511095d.512808","name":"","property":"payload","propertyType":"msg","rules":[{"t":"true"},{"t":"false"}],"checkall":"true","repair":false,"outputs":2,"x":200,"y":750,"wires":[["d3cd1f2c.519bd"],["dcbbf896.32fb28"]]},{"id":"d3cd1f2c.519bd","type":"change","z":"d511095d.512808","name":"","rules":[{"t":"set","p":"label","pt":"msg","to":"now turn off","tot":"str"}],"action":"","property":"","from":"","to":"","reg":false,"x":400,"y":705,"wires":[["695a1cfd.452994"]]},{"id":"ccbdd82d.3c19b8","type":"ui_group","z":"","name":"Default","tab":"7d974e73.cf8f9","order":3,"disp":true,"width":"6","collapse":false},{"id":"7d974e73.cf8f9","type":"ui_tab","z":"d511095d.512808","name":"Home","icon":"link","order":1}]
10 Likes

It's a nice example! By using this a lot by now I have noticed a minor bug.
If you change button background color this way, the button hover state (with animations) will be lost.
It's of course nothing special but for design geeks ... you never know :smiley:

For design geeks - they would start with a different dashboard !

(improvement suggestions welcome)

I really like this.

You used fa fa-rotate-90 fa-folder-open-o & closed. Are there other icons available and if so what is available please?

1 Like

As the info for the button widget says...

(* only Fa-icons 4.7)

Nice one!

Thanks

Well the basis of default set of dashboard widgets is not that bad to not give it a try. For me (miles from being a design geek :smiley: ), the CSS has always been that famous "never properly closing window blinds". No mater that, with slight override of default CSS, I managed to get my dashboard to look quite ok without wasting too much time on it. So It has it's powers. That's for sure.
image

Oh dear... just when I thought I'd created a nice control dashboard - Using switch node to show actual state

@hotNipi - I'm deflated now :disappointed_relieved: .....

Very nice. Are any of those "slight overrides" something generalisable about the layout ? or are they "just" theming ?
PS - sort of a pre-announcement - did you see the PR in master that allows this ? https://github.com/node-red/node-red-dashboard/wiki/Creating-New-Dashboard-Widgets
testing/feedback appreciated before it goes out.

Theming with CSS override on backgrounds and buttons and sliders simple widgets. Default gauges and graphs can't be modified with ease so I created some own widgets. They are done with ui_template by using svg elements.
I definitely will explore the Creating-New-Dashboard-Widgets. The idea itself is promising enough :slight_smile:

Cheers

2 Likes

Hi @hotNipi what I nice dashboard , I trying to learn on how to do something similar like you did, is possible to get sample code of what you did ?

Here is how I did it.

  1. Make full working solution of dashboard, using default settings and default dashboard widgets.

  2. Observe the result with all the devices, you will be using it.

  3. Figure out the best layout for elements as there will be one layout for all devices. (unit size, card sizes ....)

  4. Make the list of the problems you need to solve with custom design. (Colors, fonts, sizes, behavior and look of elements, readability issues ....)

  5. Open your dashboard and explore all the elements with browser dev tools. (same time you may need to educate yourself on topic of html, css, angular... https://www.w3schools.com/)

  6. Place ui_template node somewhere in your project and make sure it is configured like this:
    image

  7. Place<style> tags in it and start overriding all you dont like on your dashboard. Don't miss the thing.

  8. Show us the result :slight_smile:

If some element does not give up and does not look as you might like, ask specific questions here and for sure you'll get help.

Happy styling :slight_smile:

2 Likes

@dceejay I came across this post thinking this was exactly what I need but it does not seem to work for me. I am trying to change the button color when the button is clicked and then when another button is pressed, change it back to the original color. I realize that is a little complicated so I am starting with just changing the button color with each click. I copied the flow you provided and changed it to what I needed and my button is just the original default color and does not change when pressed.

my original example at the top still works - so maybe you need to share your flow so we can try to work out what is wrong ?

This is my current flow

[{"id":"64ac3933.070e88","type":"change","z":"24d531e9.e46a1e","name":"","rules":[{"t":"set","p":"colour","pt":"msg","to":"green","tot":"str"}],"action":"","property":"","from":"","to":"","reg":false,"x":435,"y":102,"wires":[["9daa42d6.ac744"]]},{"id":"2a508b1c.199094","type":"inject","z":"24d531e9.e46a1e","name":"","topic":"","payload":"","payloadType":"str","repeat":"","crontab":"","once":true,"onceDelay":"","x":240,"y":102,"wires":[["2c2ce824.67da08"]]},{"id":"17b67eb3.7e2151","type":"function","z":"24d531e9.e46a1e","name":"state","func":"var state = context.state || false;\nstate = !state;\ncontext.state = state;\nif (state) { return [msg,null]; }\nelse { return [null,msg]; }\n","outputs":2,"noerr":0,"x":240,"y":147,"wires":[["64ac3933.070e88"],["2c2ce824.67da08"]]},{"id":"2c2ce824.67da08","type":"change","z":"24d531e9.e46a1e","name":"","rules":[{"t":"set","p":"colour","pt":"msg","to":"red","tot":"str"}],"action":"","property":"","from":"","to":"","reg":false,"x":435,"y":147,"wires":[["9daa42d6.ac744"]]},{"id":"9daa42d6.ac744","type":"mui_button","z":"24d531e9.e46a1e","name":"","group":"96a86685.14e458","order":6,"width":"3","height":"2","passthru":false,"label":"Start","tooltip":"","color":"black","bgcolor":"{{colour}}","icon":"","payload":"press","payloadType":"str","topic":"Start","x":635,"y":205,"wires":[["17b67eb3.7e2151"]]},{"id":"96a86685.14e458","type":"mui_group","z":"","name":"Small","tab":"2d3eadc0.8c2392","order":2,"disp":false,"width":"10","collapse":false},{"id":"2d3eadc0.8c2392","type":"mui_tab","z":"","name":"Small Screen","icon":"dashboard","order":1}]

it looks like you are not using node-red-dashboard but another dashboard. The example provided works with node-red-dashboard.

If you want to use node-red-dashboard, you will first have to remove the other dashboard.

Hi @dceejay
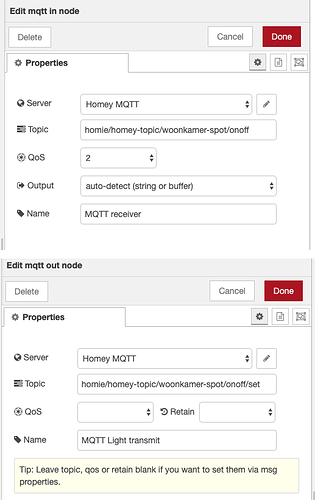
I was searching for a code like yours. Sadly I am a bit lost with the thing I want to accomplish. I am rather new to Node Red. I am using it to make a dashboard for my Homey home automation.
I would like to make buttons instead of switches. I like the way they look, more tile like.
I communicate to homey through MQTT.

Can you tell me what I am doing wrong and how to solve it?
Thanks

It is hard to tell if or what you are doing wrong based on what you shared. Button colors by state of something you can find in this example also. https://flows.nodered.org/flow/cd90709d95fcba9970bd88205871c3c7

Hi @hotNipi,
Thanks for your reply. What I like to accomplish is a button to turn my lights in the living room on and off. The button should reflect the state it is in. For example, lights on button is green with a nice bulb icon that is on. Lights off the button is red with a bulb icon that is off. The node red button should communicate with the light through MQTT (with the topic I showed, this topic works with a switch).

With my switch I use the MQTT in and MQTT out node. In my switch node I have "Pass though msg if payload matches new state:" checked. If I do that now my button goes crazy :grinning:

Do you or anyone els knows how this can be done? I used the above code but need to know how to connect the MQTT to make it work.
The link you provided looks nice but even more complex :sweat_smile:

greetings

There is one old thread also about this, may be it helps