Original thread is posted here - https://community.openhab.org/t/node-red-as-alternative-rule-engine/29509
“Node-RED is a visual wiring tool for the Internet of Things.”
From an Openhab perspective it a visual tool that can replace the builtin rules engine.
There is a good discussion thread already running here around Node-RED. The purpose of this tutorial is specifically how to replace the functionality of the Openhab rules engine with Node-RED utilizing @Peter_De_Mangelaere‘s nodes for easily connecting to Openhab.
Update 8/18 I have fully migrated my deployment over to MQTT using the built in MQTT nodes (MQTT Archives - Node RED Programming Guide) You just need to replace any input / ouput nodes in the below example with MQTT nodes. The one item of note is you can't (or at least I haven't figured out how to) request a status from the MQTT broker like you can in the OpenHAB nodes. Instead you have to store any state information in a Node-RED flow or global variable like I defined below.
As of OpenHabian v1.3, node-red is now part of the standard package.
In addition to the Openhab nodes, I’d highly recommend installing the BigTimer node. With these in place you can replicate all the functionality of the current rule capabilities of Openhab. The following is a breakdown of the OH rules capabilities and how to replicate them in Node-RED.
I also just found another set of contributed nodes to help with home automation, norelite - https://flows.nodered.org/node/norelite I will start experimenting with them and likely update this tutorial to incorporate their functionality in place of some of my workarounds (like stored variables).
This is just meant as a starting point based on my first few weeks working with Node-RED. There is still much more to cover and I will try to continue to update this over time as I learn new ways of using the tools.
Table of Contents
- Rule Triggers
- Event-based triggers
- Time-based triggers
- System-based triggers
- Scripts
- Variables
- If...then Statements
- Case Statements
- Actions
- Event Bus Related Actions
- Timers
- Logging
- Notifications
- Broadcast Notifications
- Audio & Voice
Rule Triggers
In Openhab, here are different categories of rule triggers:
- Item(-Event)-based triggers: They react on events on the openHAB event bus, i.e. commands and status updates for items
- Time-based triggers: They react at special times, e.g. at midnight, every hour, etc.
- System-based triggers: They react on certain system statuses.
Event-based Triggers
The following shows each of the different Event-based Trigger types in Openhab and how to replicate them in Node-Red
Item <item%gt; received command [<command>] / Item <item> received update [<state>]
STATUS CHANGE:
To capture a change in an item’s state in Node-Red (note, if the state doesn't change, i.e. an update with the same state, this trigger won't work), you use an Openhab2 In node from the Home_Automation section of your node pallet.
![]()
These nodes track send a message that contains the item’s state every time it changes from the top channel, and a full output of all the data associated with the items change in state from the bottom channel. Connecting to the top channel creates the same trigger event as the “Item received command” or “Item received update” triggers in Openhab. To limit the trigger to a specific “[]” or “[]” you need to add a Switch node and connect it to the first channel.
![]()
This switch node can now be setup to reflect the command(s) that you want to trigger an event on by setting logic equal to the [] or “[]” you want to base your trigger on. Each additional rule you add creates an additional output channel on the switch corresponding to the order of your rules in the node.

NO STATUS CHANGE:
If you want to catch when an item has been updated but the actual state of the item might be the same after the command or update, then you have to take a different approach. You need to use the second channel of an Openhab2 In node and add a switch node to look for an update to the status.


Item <item> changed [from <state>] [to <state>]
To create a trigger around an item state being changed you need to use the second channel of an Openhab2 In node. If all you want to do is trigger an event when an item is changed irrespective of the from/to, you need to evaluate if the node received a changed state event.


If you want to evaluate a change from a specific value, then you can use a switch which evaluates the “msg.payload.payload.oldValue” property to read the old state to create a “Item changed [from ]” trigger.


Similarly, if you want to evaluate the “[to <state>]” you need to add a second switch that checks the “msg.payload.payload.value” property.


If you also want to evaluate both the “[from <state>]” and “[to <state>]” you need to put these switches in serial to create the equivalent of an “and” condition in “if statement”

Time-based triggers
To create rules to trigger at a specific time like the Openhab “Time cron <cron expression>" trigger, is where the addon node BigTimer comes in. This node not only replaces the Time based triggers but also sunrise / sunset based triggers that you would normally use the Astro Binding for.

From the BigTimer info:
Bigtimer is probably the ultimate Node-Red timer, sending messages for start and end conditions at any time, day, month or special day.
In the simplest case, Bigtimer requires no input and you need only to consider the first output. But Bigtimer can be much more.
The first output sends out a message at your set ON or OFF times (and if the repeat tickbox is ticked - every minute)
The second output simply sends the state - 1 or 0 every minute as well as echoing the status in msg.state and msg.time. (from v1.5.6 onwards several properties have been added to msg)
The third output sends an optional message for both states - suitable for speech output or a log (this happens only at ON or OFF time).
The input can be used as an override.

System-based triggers
I have not yet experimented with System-based triggers but will update this section if/when I do.
Scripts
Scripts in OpehHab are the portion after the trigger where you design the additional logic and actions of your rules. I’ve tried to capture as many common types of script actions as possible below and will continue to add to this list based on feedback to this tutorial and my own experience.
Variables
In Node-Red you have two different types of variables:
- Flow Variables (or in Node-Red speak Flow Context) - are available to any flows on a tab. This is similar to how a variable defined in a rule file is available to any rules contained within that file
- Global Variables (Global Context) - these variables are available to any flows within your Node-Red deployment. These replace the virtual switches that most people use to store variables across rules files.
To define a variable in Node-Red, you utilize the Change nodes.

You can either transfer the payload (state) from the item node:

or enter a set value:

If...then Statements
In Node-Red you utilize the Switches to replicate If...Then statements from Openhab rules. To replicate multiple “and (&&)” or “or (||)” checks you use either serial (and) or parallel (or) flows. Or in this case if((Check1 || Check2) && Check3 && Check4)

Each Switch can either check the value of the item coming in or the value of a Flow or Global variable.
If you want to base your checks on the status of other items in OpenHab, you have two ways to do this. One option is to assign a state change to a variable as shown above (Variables)
The other is to use an openhab2-get node to lookup the item's state. Because this node returns a single response object containing item name, label, state, etc. You then need to do a logic check on a slightly modified topic to specify which you want to use.


Case Statements
Do to the fact that a single Switch node can evaluate an item state or variable against multiple conditions, it is easy to use these to replicate a Case Statement.


Actions
Actions are the core of Openhab rules within the Script section. Here are how to reproduce the Core Actions from Openhab within NodeRed.
Event Bus Related Actions
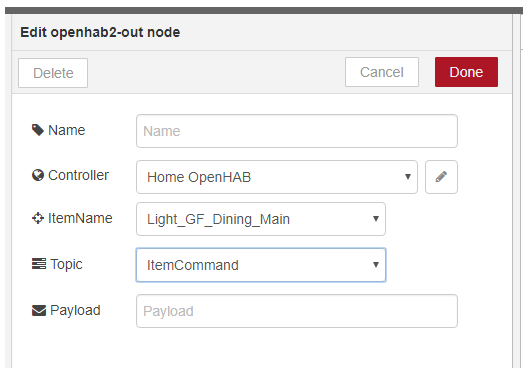
[.sendCommand() / .postUpdate()]

In the Openhab2 Nodes there is are openhab2-out nodes for sending commands or updates to Items. To specify the or you can either use the msg.payload coming in from your previous nodes, change it before it gets to the openhab2-out node using a Change node, or use the Payload override field within the openhab2-out node. To specify whether you are doing a sendCommand or postUpdate you can either specify it in the your msg.topic upstream of the openhab2-out node or use the Topic property of the node to specify.
Timers
Timers are used for a number of different scenarios in Openhab. I’ve tried to capture many of those scenarios below and how to reproduce them in Node-Red.
Delay an Action
Most timers are used to delay a specific action until a relative later point in time (i.e. turning off a light after a specific time interval). Node-Red has a Delay node for performing this same time of set time delay.
![]()

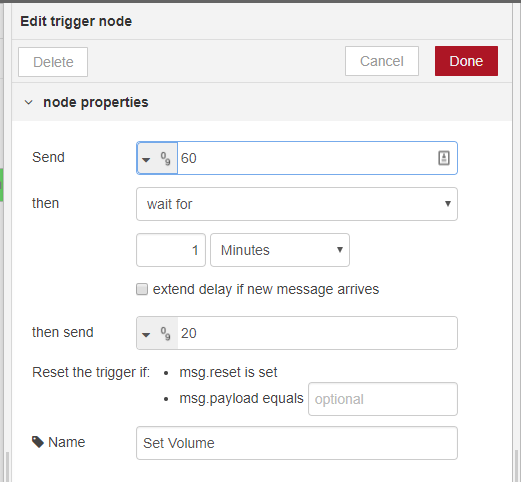
Block Other Actions During a Defined Time Period
Many times in Openhab when you don’t want an action occurring within a certain time frame of a previous action, you do so by setting a timer in the first action and then checking if a timer is still active when a second action tries to occur. In Node-Red there are a couple of different ways to accomplish this depending on some of the nuances involved. One is to use a “Rate Limit” within a delay and telling the delay to drop any messages that come in during the delay.

You can also use the Trigger node in Node-Red. These nodes are very flexible, allowing you to send actions at the start of a time period or at the end or during both. You can also extend the triggers if certain events happen. So for example if you have a motion sensor trigger a light on and then want it to turn off after the last trigger from your motion sensor you could use a trigger as follows:


As you’ll see, there are many different ways with Delays and Triggers that you can approach solving the same problem.
Logging
Logging is one of the big strengths of Node-Red. You can create immediate Debug outputs that you can see from the edit window or to File nodes to write entries to an external log file.
Notifications
While Node-RED has some addon Nodes to help support different types of notifications, I wanted to still be able to leverage some of the built in functionality of OpenHAB as well. This required setting up necessary OpenHAB items and rules to interfact into OpenHAB's functionality.
Broadcast Notifications
Through the OpenHAB Cloud Connector http://docs.openhab.org/addons/io/openhabcloud/readme.html you are able to use the mobile apps to both access your system and receive broadcast notifications http://www.myopenhab.org/. To integrate this into Node-RED requires an item to carry the notification information and a rule to trigger the notification.
Item Definition:
String vNotification "Notification [%s]"`
Notifications.rules:
rule "Send Notification"
when
	Item vNotification received update
then
	sendBroadcastNotification(vNotification.state.toString)
end
And finally a Node-RED flow to send the notification. Here I used a change node to create my text message:


You can also use the template node to include other payloads or topics into your notification message:


If you want to add a time stamp to your message I was able to put together the following to create a plain language time stamp (i.e. 3:32 pm)


For cut-and-paste purposes:
msg.payload =  msg.payload + new Date().toLocaleTimeString('en-US',{timeZoneName: 'short'});
return msg;
Audio & Voice
OpenHAB has the ability to play audio files and convert text-to-speech: http://docs.openhab.org/configuration/multimedia.html. To take advantage of this integration we follow a similar approach as we did for the Broadcast Notifications above using a combination of a custom item and a rule combined with a Node-RED flow.
First to trigger a text-to-voice (assuming you have already setup everything in OpenHAB as per above).
Item Definition:
String vSpeech
Speech.rules:
rule "Send Speech"
when
Item vSpeech received update
then
say(vSpeech.state.toString)
end
And finally a NodeRed flow to tie it together.

I went a step further with mine to control the volume levels during and after sending speech (turning it up while the speech is broadcast and turning it back down). So I created a sub-flow (https://github.com/node-red/node-red/wiki/Design:-subflows

Similarly for sending an Audio file saved to your conf/sounds directory:
Item Definition:
String vSound
Sound.rules:
rule "Send Sound"
when
	Item vSound received update
then
    playSound(vSound.state.toString)
end
And Node-RED flow:


Email
For email you can choose to use the SendMail binding http://docs.openhab.org/addons/actions/mail/readme.html or alternatively you can do it directly from Node-RED using the email node https://flows.nodered.org/node/node-red-node-email. The one trick I did apply here is I didn't want to configure each node instance with my smtp server information and I wanted the ability to turn on and off the ability to send email (so I didn't spam my wife when I was testing) so instead created an email subflow and a control flow.
Email Subflow:


Control Flow:


Change Log
06.27.2017
- Updated Item <item> changed [from <state>] [to <state>]
- Fixed missing <>
- Revised Item <item%gt; received command [<command>] / Item <item> received update [<state>] to differentiate between a change in status vs. just an update (where the status might not change)
07.04.2017 - Updated * If...then Statements to include the openhab-get node for checking item state
08.03.2017 - Added reference to node-red nodes - norelite
08.18.2017 - Added Notifications Section
- Added notes on integrating with MQTT