Playing with Jetson Nano - inference analyzis

So I have struggled a bit the last days with the Nvidia Jetson Nano

This little board is very fast in analyzing images and real time video. My application is rather simple, I forward images to the Nano Jetson from my Motion video system when a motion is detected. If someone, a person, is entering our premises when we are away or at home with our alarm system armed, I get notified on my iPhone. This setup works already since long, I have tested it running in an old laptop (with Debian), Odroids XU4 & N2 as well as RPi3+

Now it was time for the Nano Jetson adventure!

To start, a lot needs to be installed, I decided to follow " Hello AI World" guide where there are plenty of good examples (in python) that helped me to write the final solution I needed


I had to struggle quit a bit; the Jetson seems very sensitive to what power supply you use, if you have a monitor connected or not etc etc, really not as forgiving as a Pi. At the moment it is running but I do not know yet how it will work in the long term

Anyway, some timing comparisons could be of interest. If I forward the same image to my various platforms, I get the following readings for how long a successful object detection analyze takes (detecting persons in the image):

Odroid N2: 3.243597 seconds
My laptop: 0.786970 seconds
Jetson Nano: 0.07310032844543457 seconds

The Jetson, using GPU, is roughly ten times faster than my laptop!! Thats good!

For my application, it is not necessary to have such a fast processing but for real time video analytics, I believe this is very interesting (I have however not played with that part)

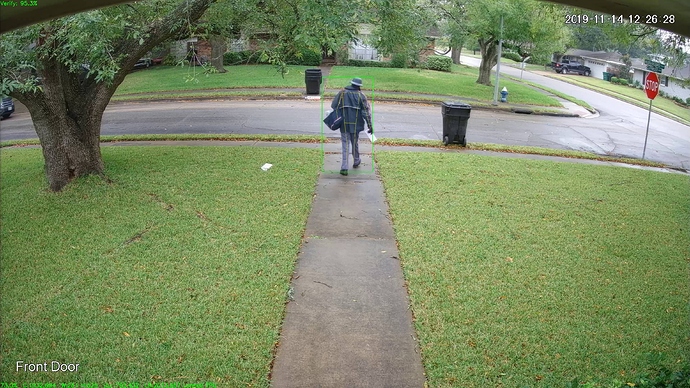
Below the image I used for testing. This is a tricky image and many models fail to detect me walking there. But both the Jetson and the others (Yolo V3) managed this well

captured51

5 Likes

Thanks for posting this. I've found the Nano to be the best <$150 IOT class computer for using the Coral TPU because it can handle more rtsp streams. This includes the Coral Mendel development board. I've used none of the "JetPack" stuff except for OpenCV, everything else is just Python3, the TPU Python support and node-red for the UI and control via the dashboard.

I just got another Nano to setup for the "pure" Jetson experience. You've given me a wonderful time saving place to start.

The immediate downside I see is the available models is really limited compared to OpenVINO and the TPU to a lessor extent. For instance I don't see a "Pose Estimation" model available for it.

I've been running my AI for over a year and collected a fair number of "false positive" images from MobileNet-SSD v1 & v2 with 15 various outdoor cameras with resolutions from D1 to UHD (4K). Using a Pose Estimation AI on the TPU as a second verification step would have rejected all these false positives when fed my collection of false positive images. Downside is it would increase the false negative rate. Seems to be the higher the camera angle and the more the person fills the frame the less likely are pose keypoints of sufficient confidence found. I'm investigating this. So far the bulk of the false negative are from cameras in more protected locations (patio, porch, garage) that have not given any false positives since I upgraded to MoblleNet-SSD v2. These confined areas necessarily make the viewing angle steeper and the person fill more of the frame.

For grins, I ran your image through it and it would have been a false negative. Not unexpected because of the high camera angle.

I think this is one of the largest issues we face as cameras need to be mounted high to avoid vandalism -- which makes we question the real world practicality of Arlo, Nest, etc. battery powered WiFi cameras, if the (expensive) cameras are mounted high enough to avoid theft, its gonna be a PITA to be changing batteries every few months.

My biggest surprise so far is that UHD cameras appear to improve the AI detection sensitivity which was totally unexpected given that the 3820x2160 image is resized to 300x300 for the AI. I ran a UHD and HD camera mounted adjacent to each other to get as close to the same field of view for each camera as I could the UHD camera detected people in more frames and further from the camera, regularly getting them well beyond my interest being on my neighbor's sidewalk across the street! So now I have to add "region masking" to filter valid detection that I don't want notifications of.

Here is a detection and verification of my mailman leaving that is at about the limit of where I want notifications. I have to reject all the ones from the horizontal sidewalk and across the street. Didn't have this problem with D1 and HD camera images:

2 Likes

Very, very nice indeed!!! And great resolution too. You are 100% right about the cameras viewing angle, and the price for those outdoor wireless type nest, a thief knowing something would be more interested stealing those instead of breaking into the garage (or car)
We have a lot to talk about!

I was slow to upgrade to 4K UHD cameras because I though the AI would be wouldn't work well with it. Using some 3 & 4 Mpixel NetCams with MobileNetSSD-v1 it sure looked like the extra resolution made detection less sensitive.

It turned out that shortly after I started running MobileNetSSD-v2 my Lorex DVR died. It was too hot to consider going up in the attic to pull new cables so I had to get a compatible "analog" replacement (called MPX, these days, basically suports all the "analog" security camera formats) DVR and figured, what the hey, get one that also supports 4K, Costco had a 4K "analog" camera for ~$90 so I tried one and was blown away by the improvement in the AI detection. Totally unexpected! I now have 5 UHD cameras in operation and 10 1080p cameras.

I think we are all benefiting by sharing ideas and results. I'm willing to share my code with anyone who is interested.

3 Likes

There has been a huge improvements made for the Jetson Nano. Check out this: https://github.com/jkjung-avt/tensorrt_demos
Examples demonstrating how to optimize caffe/tensorflow/darknet models with TensorRT and run inferencing on NVIDIA Jetson or x86_64 PC platforms

I could not resist, had to give it a go. I was targeting to use YOLO v4 that I think is the most accurate object detector of all. So basically the demo #5 and #6 optimizing TensorRT using plugins. Well the result (for all object detectors) are pretty impressive. In addition, I was happy to see that YOLO v4 tiny now detects objects in some of my tricky images where I needed the full blown YOLO v3 to find the same.

I thought about having a kind of analyzing service in python that would utilize the new optimized engines and in addition could use mqtt to be nicely integrated with NR. Something like:

image -> mqtt -> python script analyzer service -> send result -> mqtt -> NR -> image viewer etc etc

So I made a setup flow like below. The script is running on the display just to make it easier to see the progress while detecting. I put the script in the folder /home/wk/trt_projects/tensorrt_demos. You need to change this to your specific paths, also in the exec node command line. The script assumes that the yolov4-tiny-opt-416 engine has been built. The python script itself requires a number of modules to be installed with pip3 if you do not have them installed already. The version of cv2 that is included in the latest default Jetson image is good enough, I do not make any advanced operations using cv2

[{"id":"59daad36.de7434","type":"inject","z":"85a5333b.17ff7","name":"Stop","repeat":"","crontab":"","once":false,"onceDelay":0.1,"topic":"","payload":"true","payloadType":"bool","x":110,"y":240,"wires":[["d0c00b44.5fc5c8"]]},{"id":"d0c00b44.5fc5c8","type":"change","z":"85a5333b.17ff7","name":"","rules":[{"t":"set","p":"payload","pt":"msg","to":"Stop-YOLO-Analyzer","tot":"str"}],"action":"","property":"","from":"","to":"","reg":false,"x":310,"y":240,"wires":[["ff70b4ec.d53b88"]]},{"id":"ff70b4ec.d53b88","type":"mqtt out","z":"85a5333b.17ff7","name":"","topic":"image/stop","qos":"","retain":"","broker":"5f58f95.8104a08","x":540,"y":240,"wires":[]},{"id":"cf10f9c1.719218","type":"mqtt in","z":"85a5333b.17ff7","name":"","topic":"result","qos":"2","datatype":"auto","broker":"5f58f95.8104a08","x":110,"y":480,"wires":[["93d86af8.87ed88"]]},{"id":"20c50622.29e10a","type":"image viewer","z":"85a5333b.17ff7","name":"","width":"320","data":"payload","dataType":"msg","x":340,"y":540,"wires":[[]]},{"id":"93d86af8.87ed88","type":"jimp-image","z":"85a5333b.17ff7","name":"","data":"payload","dataType":"msg","ret":"img","parameter1":"","parameter1Type":"msg","parameter2":"","parameter2Type":"msg","parameter3":"","parameter3Type":"msg","parameter4":"","parameter4Type":"msg","parameter5":"","parameter5Type":"msg","parameter6":"","parameter6Type":"msg","parameter7":"","parameter7Type":"msg","parameter8":"","parameter8Type":"msg","parameterCount":0,"jimpFunction":"none","selectedJimpFunction":{"name":"none","fn":"none","description":"Just loads the image.","parameters":[]},"x":340,"y":480,"wires":[["20c50622.29e10a"]]},{"id":"15072d69.25bff3","type":"http request","z":"85a5333b.17ff7","name":"https://loremflickr.com/640/480/person","method":"GET","ret":"bin","paytoqs":false,"url":"https://loremflickr.com/640/480/person","tls":"","persist":true,"proxy":"","authType":"","x":450,"y":370,"wires":[["e2c4def1.99418","3fdd02a5.88d0fe"]]},{"id":"8f7dbdb4.6eced","type":"inject","z":"85a5333b.17ff7","name":"","props":[{"p":"payload"},{"p":"topic","vt":"str"}],"repeat":"","crontab":"","once":false,"onceDelay":0.1,"topic":"","payload":"true","payloadType":"bool","x":110,"y":370,"wires":[["15072d69.25bff3"]]},{"id":"e2c4def1.99418","type":"mqtt out","z":"85a5333b.17ff7","name":"","topic":"image/51","qos":"","retain":"","broker":"5f58f95.8104a08","x":790,"y":370,"wires":[]},{"id":"3fdd02a5.88d0fe","type":"image viewer","z":"85a5333b.17ff7","name":"","width":"320","data":"payload","dataType":"msg","x":780,"y":430,"wires":[[]]},{"id":"54643313.a69f4c","type":"exec","z":"85a5333b.17ff7","command":"export DISPLAY=:0 && xterm -geometry 96x24-150+150 -e \"cd /home/wk/trt_projects/tensorrt_demos && python3 /home/wk/trt_projects/tensorrt_demos/trt_yolov4_to_mqtt.py\"","addpay":false,"append":"","useSpawn":"false","timer":"","oldrc":false,"name":"","x":650,"y":170,"wires":[[],[],[]]},{"id":"f3494b31.ed5548","type":"inject","z":"85a5333b.17ff7","name":"Start","repeat":"","crontab":"","once":false,"onceDelay":"10","topic":"","payload":"true","payloadType":"bool","x":110,"y":100,"wires":[["54643313.a69f4c"]]},{"id":"be08ae32.8d02c","type":"comment","z":"85a5333b.17ff7","name":"Starting & stopping services","info":"","x":180,"y":60,"wires":[]},{"id":"8ba1ff8e.34d6","type":"comment","z":"85a5333b.17ff7","name":"Send images","info":"","x":130,"y":330,"wires":[]},{"id":"8c4c9f74.3f5bd","type":"comment","z":"85a5333b.17ff7","name":"View the result","info":"","x":140,"y":440,"wires":[]},{"id":"5f58f95.8104a08","type":"mqtt-broker","z":"","name":"","broker":"127.0.0.1","port":"1883","clientid":"","usetls":false,"compatmode":false,"keepalive":"60","cleansession":true,"birthTopic":"","birthQos":"0","birthPayload":"","closeTopic":"","closeQos":"0","closePayload":"","willTopic":"","willQos":"0","willPayload":""}]

The script is below (just change extension to .py). To send images to the script it is just to publish the buffer data to the broker topic. I have used image/XX where XX is a unique camera number in my case but you could use anything as XX.
trt_yolov4_to_mqtt.txt (4.1 KB)

If you decide to try demo #6 better first check your versions of TensorRT. My "old" installation showed I had 5.1.6 and that is too old for building the opt versions using plugins. Now with the new image downloaded I have 7.1.3

When you build the engines, at least this what I saw for the opt version, do plan if you want to run the Nano headless or not. I built with a monitor attached and then I got warning when running it without. So I rebuilt without monitor attached, using vnc. Then it worked fine without the warning. See here: https://github.com/jkjung-avt/tensorrt_demos/issues/194

If you start-off from a new downloaded image, see also here: https://github.com/jkjung-avt/tensorrt_demos/issues/193

The result is not disappointing, reaching around 20 fps!!!

Best regards, Walter

5 Likes

For readers interested, I have made some movie demos showing the power of the Jetson Nano when used in combination with Node-RED, Python and YOLO v4. In those examples I have streamed parts of some recorded movies

The system structure is like this simplified

In Node-RED flow (part one, decoding video file stream):
Video source -> ffmpeg -> pipe2jpeg -> mqtt out

The Python script:
mqtt in -> images put into queue -> consuming & YOLO analyzing images -> mqtt out

In Node-RED (part two, presenting result in dashboard):
mqtt in -> present video, show current queue size

Best regards, Walter

Below links to the movies at Google Drive


5 Likes

Are these movies screen captures of your node-red dashboard ?

You piped pre-recorded footage into the Nano Yolo with ffmpeg, correct? Or is that your dashcam video of you fleeing the police :slight_smile:

Was everything done on the Nano?

What is the Queue depth that is being reported? Appears slowly monotonically increasing in the first stable in the second which seems to be much lower frame rate.

Yes they are, using the node-red-contrib-ui-media for the video view

Would be exciting if it was from my dashcam...but no, it is from a pre-recorded, from The Driver, a British crime drama television serial, set in Manchester, which aired on BBC One between September 23 and October 7, 2014

Yes, everything is running on the same Nano at power mode 5W (using MAXN made a slight improvement)

The queue depth is the number of frames the YOLO analyzer is lagging behind. In the Python script I have two running threads; one is receiving frames from the ffmpeg streamer via mqtt and putting those into a (Python) queue, the other is consuming frames from the same queue, doing the YOLO analyze and producing the output frames you see in the dashboard. So if the queue increases means we are pushing frames faster than the analyzer is able to cope with.

In the first movie we get approx 8-10 fps with frame sizes 1280x720. In the second the ffmpeg streamer is able to deliver approx 4 fps with frame sizes 1920x1080. I guess the reason for the "slow motion" feeling is that the analyzer simply needs more time to analyze the larger frames and the number of objects (pedestrians) found

The pre-recorded movies are stored on a SSD disk on my network so Nano is picking them up over the network. Having them stored locally did not make any difference to the performance what I could see

I made this exercise to see if I could get a "smoother" result. In my previous solution, frames could be lost but in this setup they are all captured using a queue so they will all be processed. But the problem is if we are lagging behind; the real time viewing will be delayed and sooner or later, we will run out of memory if the queue is allowed to grow unlimited.

Thinking about this further, it is a bit depending on your application. If you just want to produce a "smooth" result like in my example, fine. But in security applications it will not work lagging behind, here I believe it is better to lose some frames in favor of being in sync with reality. Imagine an intruder entering your premises, you would like to get a warning instantly and not 10 seconds later when the analyzer finally crunched enough frames from the queue. It also indicates it makes no sense to push frames from security cameras at higher rate than the analyzer is able to process. So in this aspect, having a queue and monitoring the size of it, could help to fine tune the maximum frame rate for cameras used in security applications

3 Likes

Thanks for sharing this. Really cool.
I am just wondering what is your use case for this ?
Is it security - to detect if someone is approaching your property ?

Yes, exactly. The reason for all this experimenting is to find the very best model and algorithms to detect accurately & fast but at the same time reduce false alarms to a minimum which is the biggest challenge when using video analytics in this type of applications Currently I have found that YOLO is the best combined with a decent small computer board like the NVIDIA Jetson Nano. One thing is for sure when using YOLO, you need powerful GPU's to reduce computation time. So a RPi is not an option if you look for high performance even if the detection is as accurate

1 Like

My next strategy, when I have time to get back to it hopefully in a week or two, is to add a Nano running YOLO on a Nano to my system as a "verification" for persons detected with my current MobilenetSSD-v2 system. A single Coral TPU on an i7 miniPC is supporting 7 4K cameras and 8 1080p cameras with an aggregate frame rate of ~33 fps -- a bit over 2 fps per camera. The real limitation is the decoding of the 15 rtsp streams.

All my cameras are outdoor facing and my current "false positive" rate is less then one in 10 million frames (still not quite good enough), but I've gotten close as most of my false detections are from static objects that false detect as a person when the lighting is "just right". I filter them out by the bounding box coordinates. Specifically if the upper left and lower right coordinates match previously observed false detections to within a tolerance, I reject the detection and don't notify. Its been a couple of months since I've had to deal with a new false detection.

Since I upgraded to 4K camera I've also had to add a region of interest filter to make sure the lower right corner of the bounding box is on my property -- otherwise it regularly picks up people walking on the sidewalk across the street. A real detection, but also a real annoyance as these are normal activity of no interest to me.

So far the best use of my system has been the near instant notifications I get of the Mailman or Amazon making deliveries.

2 Likes

Sounds like you have a smart solution already in place, rejecting detections matching coordinates of previously observed false detections. Might be further improved if you could "crop" the part of the image where detection is observed and then just send that clip further on to the YOLO but I have no idea if this will actually improve your total solution

Actually in the current code I am cropping about 10% larger than the detection box and rerunning the inference on this sub-image with a higher acceptance threshold. So I hope another model running on a different system can further improve things and let me increase the frame rate a bit by not doing the repeat analysis for every detection.

its been working well enough that I feel no real urgency to change it, and have started some other projects that have ended up taking a lot more time than expected so I haven't been able to get back to it, hopefully in a week or two.

How important is this for your use case ?

I like a frame rate of 2-3 per second per camera. Everything is biased to make the false positive rate as close to zero as possible. The idea is if the frame rate is high enough a false negative is of little consequence as another opportunity for a true positive happens again in 300-500 milliseconds.

I pick up people riding bicycles down my street and usually motorcycles too (speed limit 30MPH but many go faster) people running or walking are in the camera field of view for a longer time.

1 Like

I agree on this. Especially for cameras with a narrow or close view angle you might not have more than a second or two for detection. And some of the frames might not be good.

In my system I have normally fps=1 from cameras but as soon as movement is detected, the fram rate increases to 10 fps. After I added a buffer to my Python script, all frames are put into a queue so they will all be analyzed for objects, I don't miss any objects anymore, this seems to work pretty well now. I can see how the queue increases in size as long as new frames are arriving. I'm using full version of YOLOv4 and the processing time is for sure heavily depending on the computing power. It's seems also that the Jetson Nano "enjoys" getting a lot of frames pushed to it. If you looked at one of the movies I made, the processing time is on average in the range 0.06-0.10 seconds per frame @5W, pretty good. Increasing to @MAXN, the processing time is on average 0.035 seconds per frame

Just for the thrill I tried with a RPi3B+. Honestly, it is too slow to be used in production, processing time is around 12-13 seconds per frame. It detects as accurate as the others while struggling consuming frames from the queue. It's also getting too hot and almost all memory is consumed (for testing I increased the swap, it helped but it would kill the sd card sooner or later). Changing the model to the tiny version improved a lot in performance, around ten times faster but the accuracy obviously went down. End of that part.

Best regards, Walter

2 Likes