Sending msg.payload from ui template

Hello again,

I know there are loads of posts / threads online about this, but I have been reading and trying for hours and I cannot understand it at all.

I have a v basic table on a dashboard template, where you can select a row which is saved to the variable 'row_value'. ALL I would like to do is send this string out as the message payload, but I cannot work it out. I know the basic mechanics work because I can call a function and pass it the variable which prints to the screen, but any attempt at variations on scope.send get me no where.

The code is below (as ever any hope would be wonderful):-

<div>
 <table id="table" border="1">
    <tbody>
        <tr ng-repeat="row in msg.payload">
            <td class="numeric" >{{row}}</td>
        </tr>
    </tbody>
</table>      
</div>

<style>
 
</style>

  <script>
        document.getElementById('table')
            .addEventListener('click', function (item) {
  
                var row = item.path[1];
  
                var row_value = "";
  
                for (var j = 0; j < row.cells.length; j++) {
  
                    row_value += row.cells[j].innerHTML;
                    row_value += " | ";
                }
               
               send_payload(row_value);
                                    
                if (row.classList.contains('highlight'))
                    row.classList.remove('highlight');
                else
                    row.classList.add('highlight');
            });
            
        function send_payload(row_value)
        {
        alert(row_value);
        
        }
  </script>
  

I typically use this code, works for me (from the javascript section)

this.scope.send({payload:'do_something'});

From html section I use something like this as example

ng-click="send({payload:action('snapshot?mainview_url'), topic:'Snapshot'})"

Hi Krambriw

Thanks v much for your answer, but it doesn't seem to work.

I assumed from what you said that I could do the following:-

function send_payload(row_value)
        {
        alert(row_value);
        this.scope.send({payload:'do_something'});
        
        }

And then call this function from the other, but nothing happens.

Sorry if I haven't quite understood you.

Kind regards

Paul

You can try this flow. It works for me. When you click the button in the ui, the incoming message is first displayed in an alert and then a new message is sent to the output and debug

image

[
    {
        "id": "f92c253624f0cf2b",
        "type": "ui_template",
        "z": "9d25cf346b0f2cd7",
        "group": "37c01d1ed861d1de",
        "name": "test",
        "order": 1,
        "width": 4,
        "height": 3,
        "format": "<script type=\"text/javascript\">\n\n(function(scope) {\n    scope.$watch('msg', function(msg) {\n        if (msg.payload.match('check')) {\n            alert(msg.payload);\n            scope.send({payload:'found check'});\n        }\n    });\n})(scope);\n\n</script>\n\n",
        "storeOutMessages": false,
        "fwdInMessages": false,
        "resendOnRefresh": false,
        "templateScope": "local",
        "className": "",
        "x": 490,
        "y": 290,
        "wires": [
            [
                "a3ad04fd54c53164"
            ]
        ]
    },
    {
        "id": "a3ad04fd54c53164",
        "type": "debug",
        "z": "9d25cf346b0f2cd7",
        "name": "",
        "active": true,
        "tosidebar": true,
        "console": false,
        "tostatus": false,
        "complete": "true",
        "targetType": "full",
        "statusVal": "",
        "statusType": "auto",
        "x": 670,
        "y": 290,
        "wires": []
    },
    {
        "id": "1261a8272cddc815",
        "type": "ui_button",
        "z": "9d25cf346b0f2cd7",
        "name": "",
        "group": "37c01d1ed861d1de",
        "order": 1,
        "width": 0,
        "height": 0,
        "passthru": false,
        "label": "button",
        "tooltip": "",
        "color": "",
        "bgcolor": "",
        "className": "",
        "icon": "",
        "payload": "check",
        "payloadType": "str",
        "topic": "topic",
        "topicType": "msg",
        "x": 310,
        "y": 290,
        "wires": [
            [
                "f92c253624f0cf2b"
            ]
        ]
    },
    {
        "id": "37c01d1ed861d1de",
        "type": "ui_group",
        "name": "Test",
        "tab": "1b5936d6e36d4c1e",
        "order": 1,
        "disp": true,
        "width": "6",
        "collapse": false,
        "className": ""
    },
    {
        "id": "1b5936d6e36d4c1e",
        "type": "ui_tab",
        "name": "Test",
        "icon": "dashboard",
        "disabled": false,
        "hidden": false
    }
]

1 Like

Hi krambriw

Thanks again for your reply, but the problem I have is slightly different I think / or I haven't explained it very well.

I can do what you describe above, that's no problem ie scope.watch for an incoming message then do something.

The bit I can't do is trigger it without an incoming message.

All I would like to do is send a variable produced by a javascript function back to the flow via msg.payload.

Thanks v much for your patience

Kind regards

Paul

Hello,
You need to trigger the execution in some way, otherwise the code will just sit there doing nothing. How would you know it is time to execute? By selecting a row in the table? Then you need to find a way to use that "selection" as the trigger

So I have examples how to select an action by clicking an icon within a row of a table but then you do not need to call a script section, or you can call a function in a script section.

In any case you need a ng-click in your html so you trigger an event from the template node, so that you generate a msg directly.

So what I recommend to do is - use a payload with objects as rows for your table.

clicking on one of these icons will generate a msg to do some actions in a further flow:

The screenshot in the table below - is created with a payload of objects:

so in this example you can see that you can directly refer to the clicked row.

If you need an example how to call a script section by clicking on an element and sending a msg - here is a code example as well:

<div>
    <table style="width:100%">
        <tr>
            <td align="center"><md-button style="text-transform:uppercase;" ng-click="send({payload: submit2(msg.payload)})">Ăśbernehmen</md-button></td>
        </tr>
    </table>
</div>

<script>

this.scope.submit2 = function(chart) {
    var key;
    for (key in chart) {
        chart[key] = (document.getElementById('chart_' + key)).value;
    }
    return chart;
}


</script>

So in summary the msg you will send is always done with

ng-click="send ...."

in your html section regardless if you need a script to evaluate something from the page or not.

So I have never used an event listener as you did - but may it is not necessary as I explained in my first example.

An other easy example - how to get the row index is using the internal variable $index.

Try this flow:

[
    {
        "id": "dd090153.6381a",
        "type": "debug",
        "z": "dce8fa20.2e93c8",
        "name": "",
        "active": true,
        "tosidebar": true,
        "console": false,
        "tostatus": false,
        "complete": "true",
        "targetType": "full",
        "x": 610,
        "y": 740,
        "wires": []
    },
    {
        "id": "149dc550.0ad30b",
        "type": "inject",
        "z": "dce8fa20.2e93c8",
        "name": "",
        "repeat": "",
        "crontab": "",
        "once": false,
        "onceDelay": 0.1,
        "topic": "time",
        "payload": "",
        "payloadType": "date",
        "x": 140,
        "y": 660,
        "wires": [
            [
                "c3ceb6dd.40c6a8"
            ]
        ]
    },
    {
        "id": "c3ceb6dd.40c6a8",
        "type": "function",
        "z": "dce8fa20.2e93c8",
        "name": "",
        "func": "msg.payload=[{sensor:\"sensor1\",battery:12.5,temp:21},{sensor:\"sensor2\",battery:13.5,temp:24}];\n\nreturn msg;",
        "outputs": 1,
        "noerr": 0,
        "x": 350,
        "y": 680,
        "wires": [
            [
                "582467cc.6326d8"
            ]
        ]
    },
    {
        "id": "582467cc.6326d8",
        "type": "ui_template",
        "z": "dce8fa20.2e93c8",
        "group": "de0e68e4.027ef8",
        "name": "",
        "order": 5,
        "width": "0",
        "height": "0",
        "format": "<style>\n.main\n{\n    height:400px;\n    width:400px;\n    background:dimgrey;\n        \n}\n</style>\n<div class=\"main\">\n    <table>\n    <tr><th>Sensor</th><th>Battery</th><th>Temperature</th></tr>\n     <tr ng-repeat=\"y in msg.payload\">\n    <td>{{y.sensor}}</td><td>{{y.battery}}</td><td>{{y.temp}}</td>\n    <td><input type=\"button\" ng-click=\"send({payload:$index,topic:'ok'})\">OK </td>\n\n\n</tr>\n</table>\n</div>",
        "storeOutMessages": true,
        "fwdInMessages": false,
        "resendOnRefresh": true,
        "templateScope": "local",
        "className": "",
        "x": 520,
        "y": 660,
        "wires": [
            [
                "dd090153.6381a",
                "ed9e1613.c55b18"
            ]
        ]
    },
    {
        "id": "e82de633.e648b8",
        "type": "comment",
        "z": "dce8fa20.2e93c8",
        "name": "test8",
        "info": "",
        "x": 350,
        "y": 580,
        "wires": []
    },
    {
        "id": "ed9e1613.c55b18",
        "type": "delay",
        "z": "dce8fa20.2e93c8",
        "name": "",
        "pauseType": "delay",
        "timeout": "100",
        "timeoutUnits": "milliseconds",
        "rate": "1",
        "nbRateUnits": "1",
        "rateUnits": "second",
        "randomFirst": "1",
        "randomLast": "5",
        "randomUnits": "seconds",
        "drop": false,
        "outputs": 1,
        "x": 360,
        "y": 740,
        "wires": [
            [
                "c3ceb6dd.40c6a8"
            ]
        ]
    },
    {
        "id": "de0e68e4.027ef8",
        "type": "ui_group",
        "name": "test8",
        "tab": "2ce144dc.d7472c",
        "order": 4,
        "disp": true,
        "width": "10",
        "collapse": false
    },
    {
        "id": "2ce144dc.d7472c",
        "type": "ui_tab",
        "name": "test",
        "icon": "dashboard",
        "order": 22,
        "disabled": false,
        "hidden": false
    }
]

This will generate a small table with a button - but you can use any item with a click event:

image

Important is the internal $index variable which will be send in the payload:

ng-click="send({payload:$index,topic:'ok'})"

This will send you the row number as index in your payload back:

So in summary, add a ng-click in your cell, return either the index or a value of row resp. your value - and it should work.

So taking your code - this should work:

<div>
 <table id="table" border="1">
    <tbody>
        <tr ng-repeat="row in msg.payload">
            <td class="numeric" ng-click="send({payload:row})">{{row}}</td>
        </tr>
    </tbody>
</table>      
</div>

If you combine it with a script function in the template node to change a visual feedback is another story. Extracting values of your row can be performed later on - if the payload contains the whole row and must not be performed within the template node.

Hi Mickym2

Thank you sooooo much for your help and time, the code example works perfectly.

An at last it becomes clear.

Forgive me, because I am very new to this, but just to clarify one thing - does the following line from one of your examples create a msg.payload from the function (chart):-

ng-click="send({payload: submit2(msg.payload)})

Which is accessed by calling submit2?

Again, thanks a million, I have been stumped on this for days.

Kind regards

Paul

The payload is created in the html section by ng-click "send ... " - however you are right, the example demonstrates how to call a function in a script block of a template node. So within the send string I call the submit2 function with the original payload as parameter and send later as payload the result of the submit2 function.

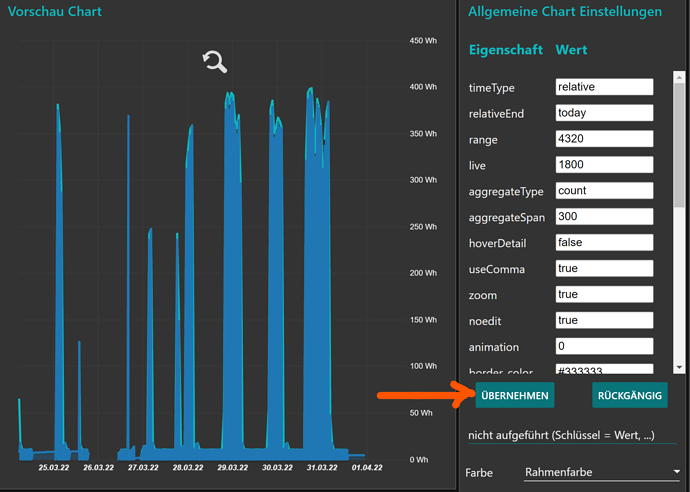
I use this to update the original values from the payload with new values of input boxes in the template node. It is not nice - but functional.

So if I press the marked button, the payload is updated by the current values - calling the submit2 function which analyzes the current document values.

This is only working - as when creating the template node - each inbox gets a defined key. And it is important that you keep in mind that all template nodes on the same page/tab share the same namespace, so when you create several template nodes you can access all elements by its ID.

The reason why I didn't use the standard ui input nodes - was that I was just too lazy and I wanted a Q&D solution (how to specify a lot of parameters).

So the code for creating this list was a simple template node using the following code:

<div id="{{'my_'+$id}}" class="main">
    <form>
    <table id="t01">

   
    <!-- <tr><th width=150 align=left>Eigenschaft</th><th align=left>Wert</th></tr> -->
    
   <tr ng-repeat="(key, y) in msg.payload">
        <td width=110>{{key}}</td>
        <td><input type="text" id="{{'chart_'+ key}}" name="fname" value={{y}} size="12"></td>
    </tr> 

    </table>
  
    </form>
</div>

At least - so you can understand the function submit2 in the first code. The flow itself is pretty complex - but it is important to understand the template nodes in general. So the represent not a html page in total, they can be combined and even automatically created by using separate ids.

So all template nodes can be understood as placeholders which have always be filled with content. My best example using about 50 template nodes on my weather dashboard page. :wink:

So in summary - what I want to demonstrate is also that control (if using defined Element-IDs) can also be performed by a complete different template node - as I did in this example for chart parameters - as you have access to all elements within one page. So you can build your table and then use another template node to read values or states of individual elements.

In general you need to understand, that msg.payload and creation of the web page (template node) are performed within different times - i.e. if you want to access msg.payload parameters within the template node you need special sections. In this case please look to this documentation: Node Dashboard: How to access the msg object in a Template script (flow) - Node-RED

So I didn't create own message handlers , like you tried it in your script section - I am not a WEB developer, so I can't help you, if this is your intention.

@mickym2
Perfect example!

Just to add, to extend what is sent is also easy, like if you also want the battery status from your example

    <td><input type="button" ng-click="send({payload:$index,topic:'ok', battery:y.battery})">OK </td>

Thank you very much,

I understand why now as well as how.

Kind regards

Paul

Hello again

(feel free to ignore this, because I know I've been getting a lot of help lately)

But, could someone tell me how I might highlight a row in a table when its clicked on. From the above I know how to access the $index variable which gives me the row, but I'm a bit stuck on how to use this to highlight the row.

From what I've read you can use ng-class and css to dynamically change the background colour, which I have tried in various ways, but to no affect. So any direction / suggested reading would be fabulous.

Kind regards

Paul

Hello Again Peoples

I just thought I would post the answer to the above question, after having eventually figured it out (hopefully it might be useful to someone).

This is obviously not aimed at the people on this thread who are scarily good at this kind of thing, but for a beginner like me:-

So (code in the ng-repeat table):-

<tbody>
        <tr ng-repeat="row in msg.payload" ng-class="{'selected':$index == selectedRow}"> 
           <td class="numeric" ng-click="setClickedRow($index)">{{row}}</td>


        </tr>
    </tbody>

code in the css style section:-

 .selected {
    background-color: red;
}

code in the script section:-

(function($scope) {
    $scope.selectedRow = null;  
    $scope.setClickedRow = function(index){  
    $scope.selectedRow = index;
  
  };
   
})(scope);

As far as I understand it, you can modify the styling of the rows using 'ng-class' and then specifying it in the 'style' section (the same as you would normally).

In this case (I think) the class is dynamically assigned / unassigned by the function called by ng-click.

This topic was automatically closed 14 days after the last reply. New replies are no longer allowed.