Hi all, finally got round to starting a comprehensive guide to setting up Cloudflare's Zero Trust proxy access. This is the first draft, please let me know of any issues.
Note that this has been taken direct from the UIBUILDER documentation, it will be live in UIBUILDER v7.6. Republished here for folk who - bizarrely ![]() - choose not to use UIBUILDER.
- choose not to use UIBUILDER.
Status: draft
A guide on integrating Cloudflare Zero Trust with Node-RED for enhanced Internet-facing security. Providing secure Internet access to locally-running Node-RED instances.
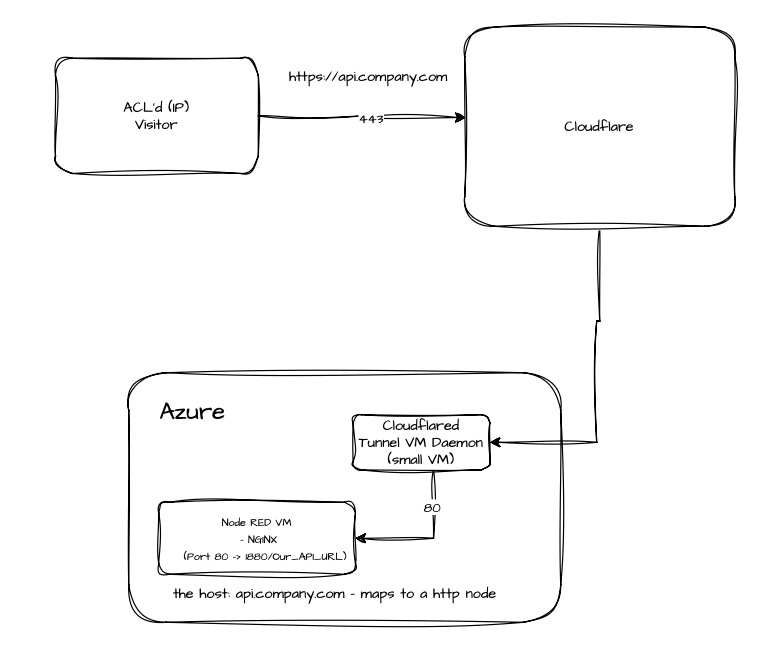
Cloudflare's Zero Trust (CFZT) platform provides excellent Internet security for your custom applications. It allows you to create a secure connection between the Internet and your private applications, including Node-RED and UIBUILDER.
Cloudflare provides a generous free tier for personal use, so you can get started without incurring costs. For many uses, the free tier is sufficient.
[!TIP]
CFZT will try to set up a secured application connection behind some kind of login. While you absolutely should do this for your initial playing, you should note that you can set up an application connection that is open to anyone with the link.To do this, you can skip the setup of an "Application" (which appears under the Access controls section of the dashboard). If one has been set up, you can remove it. The alternative is to create an access policy that has a "Bypass" action and an "Include" rule of "Everyone". You may still wish to add a 2nd "Exclude" rule based on "Country" to block access from high-risk countries.
[!WARNING]
If you create an open access link to your Node-RED instance, you should use the Security Rules configuration in Cloudflare's main domain dashboard to block access to the Node-RED Editor web interface. Change Node-RED'shttpAdminRootsetting to something obscure first, and then create a security rule to block access to that path. This will help prevent unauthorized access to your Node-RED editor from the Internet but will still allow local access.Set this protection up BEFORE you make your Node-RED instance publicly accessible via CFZT.
DO NOT LEAVE Node-RED'S EDITOR OPEN TO THE INTERNET WITHOUT PROPER ACCESS CONTROLS IN PLACE! You WILL get hacked!
There are three elements that need to be configured to use Cloudflare Zero Trust.
-
Cloudflare Account and Domain: You need a Cloudflare account and a domain managed by Cloudflare. If you don't have one, you can sign up for free at Cloudflare. Cloudflare do not add cost overheads for purchasing custom domain names either and so are good value.
For use of Zero Trust, you need to have your public domain managed by Cloudflare. If you are not buying your domain through Cloudflare, you will need to change your domain's nameservers to point to Cloudflare's nameservers. This is done through your domain registrar's control panel.
-
Cloudflare Zero Trust Setup
Instructions for setting up Cloudflare Zero Trust can be found in the Cloudflare documentation: Getting Started with Cloudflare Zero Trust. However, they can be somewhat confusing. The key steps are:
- Access the Cloudflare Zero Trust dashboard at Cloudflare Zero Trust. You will need to log in with your Cloudflare account.
- Follow the prompts from the Overview pages Get Started section. Choose the "Securely access private web apps without an agent" option.
This should guide you through the initial setup steps. You should choose the "cloudflared" connector option when prompted rather than the "warp" option (which is more feature rich but more complex).
-
Choose to "Connect a private web application". You must already have a public domain name set up and managed by Cloudflare to continue.
-
The next step defines the local application on your server. If you are going to run
cloudflaredon the same server as Node-RED, you can uselocalhost,httpas the protocol and the port that Node-RED is running on (default is1880). You can also point to your own local proxy service here if you prefer. -
In the next step, choose your Cloudflare managed domain name and optionally choose a sub-domain name for this application. Ideally, sub-domain names should not indicate the nature of the application (e.g.,
nodered.yourdomain.comis less secure thanapp1234.yourdomain.com). A sub-domain, while optional, is recommended so that you can have multiple, separately managed web applications in the future. -
Next step will ask you to define an Access Policy. The simplest option is the "One-time PIN" option, which will send a PIN to a registered users email address each time they log in. This is a good starting point for personal use. You can also set up more complex access policies later. The wizard will pre-select the email address you used to log in to Cloudflare.
-
Next, you are asked to choose or create a "Tunnel". The tunnel name is private so choose one that makes sense to you.
-
Next, you choose the closest operating system for your local server. This is so that Cloudflare can give you the correct installation instructions for the
cloudflaredconnector software. For most Node-RED users, this is likely to be Debian 64 bit. (which covers Debian, Ubuntu, Raspberry Pi OS, etc).At this point, Cloudflare will give you the exact commands to run on your server to install and configure the
cloudflaredconnector software. You can copy and paste these commands into a terminal session on your server.The cloudflared application will create an automatically starting service so that the tunnel is always available.
At this point, you should have a working CFZT setup that connects Cloudflare to your local Node-RED instance. Note, however, that the DNS configuration that has been set up for you may take some time to propagate through the Internet. You can check the DNS settings in the Cloudflare dashboard for your domain.
[!TIP]
At this point, you will only be able to access your application using a PIN login sent to your default cloudflare admin email address. If you want to add other users and login methods, you will need to configure the "Integrations", "Identity Providers" and "Access Controls", "Policies"/"Applications" sections of the CFZT dashboard.
You can check the tunnel status by going to the "Connectors" page (under "Networks") in the Cloudflare Zero Trust dashboard. You should see your tunnel listed as "Healthy". If you configure the tunnel, you can view the details. Note the "published application route" settings. There are some additional settings such as being able to add http headers that will be passed down to your local application. Particularly note the Access setting which tells Cloudflare to validate the access JWT token, if you leave that off, you should validate it yourself in Node-RED.
You can check your access controls by using that section of the dashboard and the "Applications" page. This is where you will also see the full public URL. If you try to access this URL, you will most likely get a "Page not found" error initially. That is because you moved the Node-RED Editor URL to a different path for security reasons (as recommended above). Check that you cannot access the Editor at this point.
[!WARNING]
You should, at this point, go through all of the network and Access Control settings in detail in the CFZT dashboard. Block out access from high-risk countries, set up additional login methods, set CORS and Cookie security, etc. Do not leave your application instance open to the Internet without proper protections in place!
[!TIP]
It is advisable to set up a simple web service on your server and use that to test your CFZT setup before exposing your Node-RED instance. This will allow you to get familiar with the CFZT configuration and ensure that everything is working correctly before exposing your Node-RED instance to the Internet. See below for a very simple node.js web server you can use for testing.
Web vs CLI Setup
CFZT allows the setup of connectors either to be done using the web dashboard (as described above) or using the command line interface (CLI) using the cloudflared software.
The web dashboard method is easier for most users, but the CLI method provides more flexibility and control.
Note that if you use the CLI method, you cannot manage the connector or tunnel from the dashboard. However, you can convert a CLI-created tunnel to a dashboard-managed tunnel. Simply attempt to configure the tunnel from the dashboard and it will detect the existing tunnel and offer to take it over.
Also if using the CLI method, you will need to manually create the cloudflare "Application" under the Access controls section of the dashboard.
Access Settings (login methods)
Set up login methods for access controls using the "Identity Providers" section under "Integrations" on the CFZT dashboard.
The simplest is the "One-time PIN" method, which sends a PIN to your email address each time you log in. It can be configured to allow self-registration so that other users can register their email addresses for access or restricted to emails set up in the dashboard.
Other methods include:
- Social and cloud services such as Google, Microsoft or GitHub account login
- Integration with identity providers such as Okta, Ping Identity, etc.
Deleting Tunnels and Applications
Remember to remove the Connector (tunnel) and the Application (access control). Then also remove the DNS entry from your Cloudflare domain dashboard.
Advanced settings
TBC - just notes for now.
Restricting to a specific URL path
- Use the
pathsetting in the CLI config. Can be a wildcard.
CLI commands
The cloudflared software provides a CLI for managing tunnels and connectors. Most of these commands will not be needed if you do everything via the web dashboard, but they can be useful for troubleshooting and advanced configuration.
[!NOTE]
Tunnels can either be managed via the web dashboard or the CLI, but not both at the same time. If you create a tunnel using the CLI, it will appear in the dashboard but you cannot manage it there until you "take over" management of it from the dashboard (which is non-reversible).If looking at the service startup script, tunnels created from the dashboard will use a
token. Tunnels created from the CLI will use a configuration YAML file (/etc/cloudflared/*.yml).A tunnel created from the dashboard will not create a config file.
[!TIP]
A single tunnel can be used for multiple application routes. This can be useful if you want to expose multiple local services via a single tunnel connection. Each tunnel requires its own configuration and system service.
Some useful commands include (assuming the use of Linux):
# List all tunnels
cloudflared tunnel list
# View details of a specific tunnel
cloudflared tunnel info <TUNNEL_ID_OR_NAME>

# Delete a specific tunnel
cloudflared tunnel delete <TUNNEL_ID_OR_NAME>
# Create a new tunnel
cloudflared tunnel create <TUNNEL_NAME>
# Route a DNS entry to a tunnel - creates a CNAME record for the subdomain
cloudflared tunnel route dns <TUNNEL_NAME> <SUBDOMAIN.YOURDOMAIN.COM
# Manually run a tunnel using a specific config file
cloudflared tunnel --config /path/to/config.yml run <TUNNEL_NAME>
# Install cloudflared as a system service
sudo cloudflared service install <TUNNEL_NAME>
# Uninstall cloudflared system service
sudo cloudflared service uninstall <TUNNEL_NAME>

# Run cloudflared in the foreground for testing
cloudflared tunnel --url http://localhost:1880
In addition, cloudflred running under systemd on Linux can also use these commands (change cloudflared if needed to your actual service name):
# Edit the service file (to change the startup options including the user name, startup args, etc)
sudo systemctl edit --full cloudflared.service
# Restart the service (e.g. after changing a config file)
sudo systemctl restart cloudflared
# Check if the service is running
sudo systemctl status cloudflared
# View the last 100 log lines and follow new log entries
sudo journalctl -u cloudflared -n 100 -f
Glossary
- cloudflared: The Cloudflare connector software that creates a secure tunnel between your local application and Cloudflare's network.
- Tunnel: A secure connection between your local application and Cloudflare's network. Visible under the Networks > Connectors section of the Cloudflare Zero Trust dashboard.
- Access Policy: The rules that define who can access your application. Configured in the Access > Applications section of the Cloudflare Zero Trust dashboard.
- Published Application Route: The public URL, local service URL and additional settings that Cloudflare uses to route traffic to your local application from the Internet.
- JWT Token: A JSON Web Token used for securely transmitting information between parties as a JSON object. Used to validate access to your application.
- Bypass Rule: An access control rule that allows certain traffic to bypass authentication and access the application directly.
- Security Rules: Rules configured in Cloudflare's main domain dashboard to control access to specific paths or resources, enhancing security for your applications. Use this to block access to the Node-RED Editor interface when exposing Node-RED to the Internet.
Simple Node.js Web Server for Testing
#!/usr/bin/env node

/** Simple HTTP server for testing
 * @description A basic HTTP server that logs all requests and errors to console
 * @port 4000
 */

const http = require('http')

const PORT = 4000
const HOST = 'localhost'

/** Handle incoming HTTP requests
 * @param {http.IncomingMessage} req - The request object
 * @param {http.ServerResponse} res - The response object
 */
const requestHandler = (req, res) => {
    const timestamp = new Date().toISOString()

    console.log(`[${timestamp}] ${req.method} ${req.url}`)
    console.log(`  Headers: ${JSON.stringify(req.headers, null, 2)}`)

    res.writeHead(200, { 'Content-Type': 'text/html' })
    res.end(`<!DOCTYPE html>
<html lang="en">
<head>
    <meta charset="UTF-8">
    <meta name="viewport" content="width=device-width, initial-scale=1.0">
    <title>Test HTTP Server</title>
</head>
<body>
    <h1>Test HTTP Server</h1>
    <p>Request received at ${timestamp}</p>
    <p>Method: ${req.method}</p>
    <p>URL: ${req.url}</p>
</body>
</html>`)
}

const server = http.createServer(requestHandler)

server.on('error', (err) => {
    console.error(`[ERROR] ${err.code}: ${err.message}`)
    if (err.code === 'EADDRINUSE') {
        console.error(`Port ${PORT} is already in use. Please use a different port.`)
    }
    process.exit(1)
})

server.listen(PORT, HOST, () => {
    console.log(`✓ HTTP server running at http://${HOST}:${PORT}/`)
    console.log('Press Ctrl+C to stop the server')
})

process.on('SIGINT', () => {
    console.log('\nShutting down server...')
    server.close(() => {
        console.log('Server stopped')
        process.exit(0)
    })
})

process.on('SIGTERM', () => {
    console.log('\nShutting down server...')
    server.close(() => {
        console.log('Server stopped')
        process.exit(0)
    })
})