huge thanks to @smanjunath211 for helping me through discord!
for those who are on my level- so don't know anything on what they should do, here's a list:
1 - create a temp folder on your OS disk, in this case i decided to call it simply "temp", and inside it put the files that you want to be displayed. let's call them "myphoto.png"
and "theotherphoto.png" for this example.
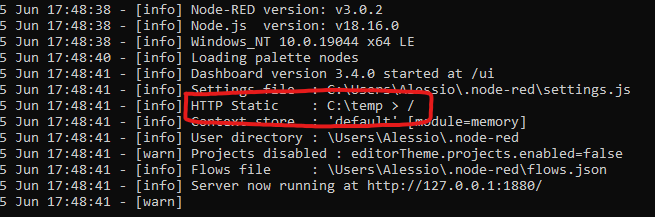
2 - find the settings.js file! this might be tricky for the newbies, but its directory can be found while booting nodered on the node.js terminal:

3 - before editing the settings.js file, create a backup, just to be sure.
4 - now we edit the file, which can be opened with notepad: search for the first "httpStatic:" line, and delete the two backslashes before the line. (tip! if you can't find it, use the 'find' tool, which can be summoned by pressing CTRL+F)
5 - this one IS IMPORTANT!! delete the directory between the '' brackets and write the name of the folder you named before: in my case: '/temp'
6 - now we can save the file and reboot NodeRed. if everything has been done correctly, you should see that a new line in the terminal has appeared, and it's the httpStatic directory!
7 - we can now test if the image got uploaded correctly, and that is by writing on the search bar the directory of the file, which in this case is going to be "localhost:1880/myphoto.png". if the photo is displayed, we can continue, if the website replies with "Cannot GET /myphoto.png" check if the name of the photo is written properly, and if it is, check the previous steps shown before, from the beginning possibly.
8 - now we can go in the flow of NodeRed: import the flow from @smanjunath211
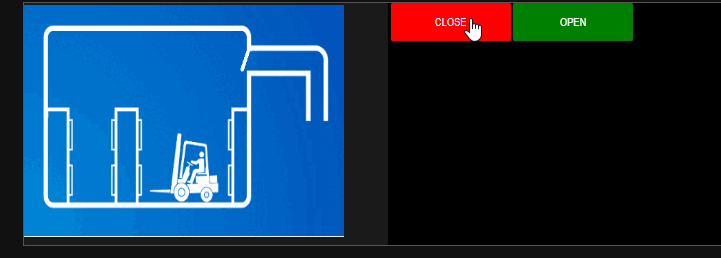
[{"id":"708559a77743b59a","type":"ui_template","z":"777d1097bd4779da","group":"1067c487a1fd6cfe","name":"","order":3,"width":"9","height":"6","format":"<body>\n\n <p>\n <a href=\"/test/close_vent.png\" target=\"_blank\">\n <img border=\"0\" alt=\"Close\" src={{msg.payload}} width=\"400\" height=\"290\">\n </a>\n </p>\n ","storeOutMessages":true,"fwdInMessages":true,"resendOnRefresh":true,"templateScope":"local","className":"","x":580,"y":180,"wires":[[]]},{"id":"77d105fa02f477fe","type":"ui_button","z":"777d1097bd4779da","name":"","group":"1067c487a1fd6cfe","order":4,"width":"3","height":"1","passthru":false,"label":"CLOSE","tooltip":"","color":"","bgcolor":"red","className":"","icon":"","payload":"/test/close_vent.png","payloadType":"str","topic":"topic","topicType":"msg","x":390,"y":180,"wires":[["708559a77743b59a"]]},{"id":"f30bf600e43529c0","type":"ui_button","z":"777d1097bd4779da","name":"","group":"1067c487a1fd6cfe","order":4,"width":"3","height":"1","passthru":false,"label":"OPEN","tooltip":"","color":"","bgcolor":"green","className":"","icon":"","payload":"/test/open_vent.png","payloadType":"str","topic":"topic","topicType":"msg","x":380,"y":270,"wires":[["708559a77743b59a"]]},{"id":"1067c487a1fd6cfe","type":"ui_group","name":"Dashboard","tab":"85b1ab4efdea8f73","order":1,"disp":false,"width":"24","collapse":false,"className":""},{"id":"85b1ab4efdea8f73","type":"ui_tab","name":"Home","icon":"dashboard","disabled":false,"hidden":false}]
and make sure you have two buttons and one template function. forgot to tell you, but you absolutely NEED the ui_media palette! check if you have it, if not, it ain't gonna work out.
(if you don't know how to import a file, that's fine, i didn't know either 3 hours before writing this guide, haha. just go in the nodered flow and press CTRL+i. a small window might pop up, and in the bigger text box you're gonna paste the whole flow code written before, then.. just import.)
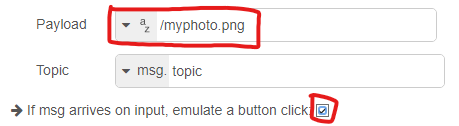
9 - open one of the two buttons and edit the playload image name: in this case, we are gonna write '/myphoto.png'. remember the slash before "myphoto.png" because you need it!!
also, check the little box under the topic text box.
10 - now everything should be good to go! if you press one of the two buttons, one of the two images should display.