Good Morning,
How can I access to collect the data from an object for instance to be displayed on a text node?
As example having the data:

Get for instance the value for Name.
I have tried several combinations like [payload[System{{msg.payload.Name}}]] and a hundred more without success.
Can someone be so kind to give me some tip?
Thanks in advance
Take a look at the page in the docs https://nodered.org/docs/user-guide/messages
which has some tips on how to get the right path to an item within the msg object.
But given you posted in the dashboard category it would be useful to know where you are trying to use this.
Thanks Ukmoose,
When I ask it here is because I already read this link and made a hundred of attempts without success, the idea is to be able to access directly the data on a template to display it on a table.
Regards
Hi @davidcgu
the message property you are trying to access is: msg.payload.System.Name.
Nick
Which you should get if you hover over that in the debug and then click the >_ icon that appears on the right.
If you don’t get the icons when you hover over the item in the debug window it might be due to being on an older version of node-red and it would be worthwhile upgrading as the trick comes in very handy.
Amazing!!!
What a moron I am… trying to make a mountain of combinations with {&{ setting the names at the beginning or at the end and nothing… was much more simple than this…
msg.payload.System.Name directly work, thanks a lots Nick
One last question regarding this topic…
This work great when the variable is a single word like “Name” but when the name of the variable has several words then it crashed and does not shows me nothing on dashboard.
For instance “Git Built” If I make {{msg.payload.System.Git Built}} does not work, how should be on those cases?
Thanks in advance
You need to read up on JavaScript.
Normally, JavaScript will assume that varable/object names meet the naming standards for JavaScript. However, being the rather flexible language it is, you can use “invalid” names too!
To do that though, you cannot use “dot” names. Instead you have to use something like:
{{ msg.payload.System['Git Built'] }}
Great thanks a lot, I'm almost done..... sorry to be boring.
Now the table seems to be showing all values, on the template I have:
ESP-RFID Telemetry
{{msg.payload.System.Name}}
Name:
{{msg.payload.System['Git Build']}}
Git Build:
{{msg.payload.System.Load }}
Load:
{{msg.payload.WiFi.IP }}
IP:
{{ msg.payload.WiFi['MAC address']}}
MAC address:
{{msg.payload.WiFi['Last Disconnect Reason str']}}
Last Disconnect Reason:
{{msg.payload.WiFi['Number reconnects']}}
Number reconnects:
{{msg.payload.WiFi.RSSI }}
RSSI:
{{ msg.payload.System.Uptime }}
Uptime:
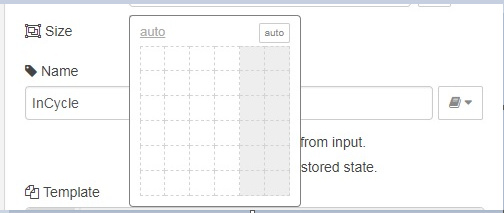
The point now is that even with the template on size "auto" not all data fits and is appearing like this:

How I can correct this? I promise it will be my last question .....sorry
Thanks in advance
Have tried to set the size manually?
Yes and what happens then is that makes a big blank gap on the bottom but still not showing the data

Did you set the size of the text widget or the group widget? Should set the size of the former not the latter.
Sorry Knolleary, I don’t understand, I tried to increase the height of the node properties as shown by Arneym, however this not works I guess I should change something on the template code itself but no idea what
Hi David,
Would you mind posting your template node code?
Thanks
Sure.... I did it before I just relised the problem is when Is shown here it shows as a website what makes you were not able to see the real code, I going to add a pciture so you can see the code
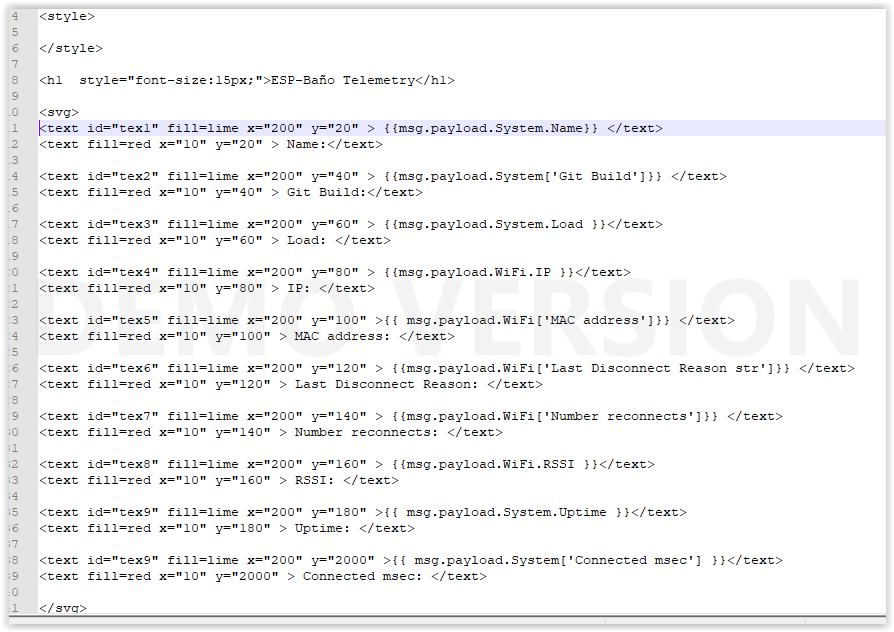
[{“id”:“bd158e5e.d9e5f”,“type”:“ui_template”,“z”:“1a7b633c.4b9d2d”,“group”:“93f350cd.acc5b”,“name”:"",“order”:0,“width”:“0”,“height”:“0”,“format”:"\n\n \n\n\n<h1 style=“font-size:15px;”>ESP-Baño Telemetry\n\n\n\n\n\n<text id=“tex1” fill=lime x=“200” y=“20” > {{msg.payload.System.Name}} \n<text fill=red x=“10” y=“20” > Name:\n\n\n<text id=“tex2” fill=lime x=“200” y=“40” > {{msg.payload.System[‘Git Build’]}} \n<text fill=red x=“10” y=“40” > Git Build:\n\n\n<text id=“tex3” fill=lime x=“200” y=“60” > {{msg.payload.System.Load }}\n<text fill=red x=“10” y=“60” > Load: \n\n\n<text id=“tex4” fill=lime x=“200” y=“80” > {{msg.payload.WiFi.IP }}\n<text fill=red x=“10” y=“80” > IP: \n\n<text id=“tex5” fill=lime x=“200” y=“100” >{{ msg.payload.WiFi[‘MAC address’]}} \n<text fill=red x=“10” y=“100” > MAC address: \n\n<text id=“tex6” fill=lime x=“200” y=“120” > {{msg.payload.WiFi[‘Last Disconnect Reason str’]}} \n<text fill=red x=“10” y=“120” > Last Disconnect Reason: \n\n<text id=“tex7” fill=lime x=“200” y=“140” > {{msg.payload.WiFi[‘Number reconnects’]}} \n<text fill=red x=“10” y=“140” > Number reconnects: \n\n<text id=“tex8” fill=lime x=“200” y=“160” > {{msg.payload.WiFi.RSSI }}\n<text fill=red x=“10” y=“160” > RSSI: \n\n<text id=“tex9” fill=lime x=“200” y=“180” >{{ msg.payload.System.Uptime }}\n<text fill=red x=“10” y=“180” > Uptime: \n\n<text id=“tex9” fill=lime x=“200” y=“2000” >{{ msg.payload.System[‘Connected msec’] }}\n<text fill=red x=“10” y=“2000” > Connected msec: \n\n",“storeOutMessages”:true,“fwdInMessages”:true,“templateScope”:“local”,“x”:660,“y”:140,“wires”:[[]]},{“id”:“93f350cd.acc5b”,“type”:“ui_group”,“z”:"",“name”:“ESP Easy”,“tab”:“1873f6ba.aeaaf9”,“order”:1,“disp”:true,“width”:“7”,“collapse”:false},{“id”:“1873f6ba.aeaaf9”,“type”:“ui_tab”,“z”:"",“name”:“TELEMETRIA”,“icon”:“dashboard”,“order”:14}]
For some reason, I can’t import your code. Could you add padding style to the class?
Hi @davidcgu
the ui_template node you have shared has both a width and height of 0. Which means you have not set its size as @arneym suggested.
In the node’s edit dialog what does it show in the Size field?
If I leave it on auto then I have:


If I set manually a big height then still does not show all the data and I see:

Don’t forget that you can wrap code in discourse in the same way as you do when writing Markdown on GitHub. start and end with 3 backticks on their own lines. This makes it rather neater and easier to copy/read.
