Getting Data from a barcode scanner into Node Red

Hello everybody,

for my home office, i use a Raspberry Pi with Node Red. This works easiely.

But as a next step I wanted to use a barcode scanner to scan some code into Node Red, as a kind of instruction code.

But my problem with that is that I do not get the scan from the barcode scanner into Node Red.
Can anyone help me?

How does your barcode scanner connect to the computer running node-red?

They often appear as serial devices, so you may be able to use the Serial node to read the incoming data… but you’ll have to experiment.

with a normal USB.
the Serial node is a good idea! I would never have thought of that.

I tried now several opportunitys but the Problem was always, that there was nothing happen in Node Red. The scanner works for e.g at a .odt file, but I don t get the datas into Node Red

So… does it talk serial ? If so how have you you configured it ? To send after a timeout would be my first suggestion as unless it sends and end of line character (\n) it won’t know when to send any data received.

I’ve got a USB barcode scanner node running on Node-RED. It’s just a wrapper for the node-usb-barcode-scanner node on npmjs.org. It’s not perfect the main issue are with it blocking Node-RED from stopping properly using node-red-stop and npm clearing out the code each time I do an npm install. However despite that it works and I use it for getting the price of things from the Tesco suermarket here in the UK.

1 Like

If you could scan the barcode with an android phone, here is a possible way:

  • Use the app barcode scanner+. Activate “copy code to clipboard”.
    You can start the app from node-red in chrome via an “intent url”

  • Use tasker or automagic to: check the clipboard for a barcode, send it to node-red (mqtt, http, etc) and switch back to the previous app (node-red as chrome webapp).

  • For feedback, load the barcode in node-red into your desired control

1 Like

First, I would like to say thanks for all those great suggestions!

@Steampunk_Prof
I already saw this “node” , but had no idea how to implemet it into node red. Do you have a example flow? Or can you help me to imlement it?

I’ll try and drop something your way in about 4 hours from now.
In the meantime, you’ll need a udev rule for it in /etc/udev/rules.d
Mine is 50-hidraw.rules:
KERNEL==“hidraw*”, GROUP=“plugdev”, MODE=“0660” RUN+="/bin/chgrp -R plugdev /dev/bus/usb/001"

Might need adjusting depending on how your barcode scanner shows up on your Pi.

In my .node-red/node_modules directory I have a directory called node-red-contrib-barcode-scanner. In that are barcode-scanner.html, barcode-scanner.js and package.json. Also into here you’ll need to do npm install node-usb-barcode-scanner.

barcode-scanner.html:

<!--
  Copyright 2016 Steampunk Professor
Licensed under the Apache License, Version 2.0 (the "License");
  you may not use this file except in compliance with the License.
  You may obtain a copy of the License at
http://www.apache.org/licenses/LICENSE-2.0
Unless required by applicable law or agreed to in writing, software
  distributed under the License is distributed on an "AS IS" BASIS,
  WITHOUT WARRANTIES OR CONDITIONS OF ANY KIND, either express or implied.
  See the License for the specific language governing permissions and
  limitations under the License.
-->

<script type="text/x-red" data-template-name="barcode-scanner">
    <div class="form-row">
        <label for="node-input-topic"><i class="fa fa-tasks"></i> Topic</label>
        <input type="text" id="node-input-topic" placeholder="Topic">
    </div>
<br/>
    <div class="form-row">
        <label for="node-input-name"><i class="fa fa-tag"></i> Name</label>
        <input type="text" id="node-input-name" placeholder="Name">
    </div>
</script>
<!-- Next, some simple help text is provided for the node.                   -->
<script type="text/x-red" data-help-name="barcode-scanner">
   <p>Simple barcode scanner input node. Sends a single message when it scans a barcode</p>
   <p>Outputs an object called <code>msg</code> containing <code>msg.topic</code> and 
   <code>msg.payload</code>. msg.payload is a String of characters corresponding to the barcode.</p>
</script>
<!-- Finally, the node type is registered along with all of its properties   -->
<!-- The example below shows a small subset of the properties that can be set-->
<script type="text/javascript">
    RED.nodes.registerType('barcode-scanner',{
        category: 'advanced-input',      // the palette category
        defaults: {             // defines the editable properties of the node
            name: {value:"Barcode Scanner"},   //  along with default values.
            topic: {value:"barcode", required:true}
        },
        inputs:0,               // set the number of inputs - only 0 or 1
        outputs:1,              // set the number of outputs - 0 to n
        // set the icon (held in icons dir below where you save the node)
        icon: "debug.png",     // saved in  icons/myicon.png
        color: "#c0deed",
        label: function() {     // sets the default label contents
            return this.name||"Barcode Scanner";
        },
        labelStyle: function() { // sets the class to apply to the label
            return this.name?"node_label_italic":"";
        }
    });
</script>

barcode-scanner.js:

/**
 * Copyright 2016 Steampunk Professor
 *
 * Licensed under the Apache License, Version 2.0 (the "License");
 * you may not use this file except in compliance with the License.
 * You may obtain a copy of the License at
 *
 * http://www.apache.org/licenses/LICENSE-2.0
 *
 * Unless required by applicable law or agreed to in writing, software
 * distributed under the License is distributed on an "AS IS" BASIS,
 * WITHOUT WARRANTIES OR CONDITIONS OF ANY KIND, either express or implied.
 * See the License for the specific language governing permissions and
 * limitations under the License.
 **/
module.exports = function(RED) {
        hids = require('./node_modules/node-usb-barcode-scanner/usbscanner');
        "use strict";
        function BarcodeScannerNode(n) {
        hids = require('./node_modules/node-usb-barcode-scanner/usbscanner');
        "use strict";
        function BarcodeScannerNode(n) {
                // Create a RED node
                RED.nodes.createNode(this,n);
                // Store local copies of the node configuration (as defined in the .html)
                this.topic = n.topic;
                // copy "this" object in case we need it in context of callbacks of other functions
                var node = this;
                var scan_device;
                var tout;
                var usbScanner = hids.usbScanner;
                var scanner;
                function findscanner() {
                        var devices = hids.getDevices();
                        for (var dev = 0; dev < devices.length; dev++) {
                                if (devices[dev].product.toLowerCase().indexOf('barcode') !== -1) {
                                        scan_device = devices[dev];
                                        break; // stop on first match
                                }
                        }

                        if (scan_device === null) {
                                tout = setTimeout( function () {
                                        findscanner();
                                },15000);
                        }
                }

                findscanner();
                if (scan_device != null) {
                        //initialize new usbScanner - takes optional parmeters
                        scanner = new usbScanner(scan_device);
                        this.status({fill:"green",shape:"dot",text:"connected"});
                        scanner.on("data", function(code){
                                var msg = {};
                                msg.topic = this.topic;
                                msg.payload = code;
                                // send out the message to the rest of the workspace
                                // ... this message will get sent at startup so  you may not see it in a debug node.

                                node.send(msg);
                        });
                scanner.on("close", function() {
                        scanner.stopScanning();
                        this.status({fill:"red",shape:"dot",text:"not connected"});
                });

        }
        else {
            findscanner();
        }
    }
    // Register the node by name. This must be called before overriding any of the
    // Node functions.
    RED.nodes.registerType("barcode-scanner",BarcodeScannerNode);
}

package.json:

{
  "name": "node-red-contrib-barcode-scanner",
  "version": "0.0.2",
  "description": "Barcode scanner node for Node-RED",
  "main": "barcode-scanner.js",
  "scripts": {
    "test": "echo \"Error: no test specified\" && exit 1"
  },
  "keywords": [
    "barcode",
    "scanner"
  ],
  "node-red": {
    "nodes": {
      "barcode-scanner": "barcode-scanner.js"
    }
  },
  "author": "Steampunk Professor <steampunkprofessor@gmail.com>",
  "license": "Apache-2.0",
  "dependencies": {
    "node-usb-barcode-scanner": "1.0.1"
  }
}

Can you post here the barcode reader model and brand?
If you can use this on a .odt file (as you said above) it is most probably configured to use “HID” interface, this means that the barcode reader behaves like a keyboard. The easiest solution for you would be changing the reader configuration so that the devices behaves like a serial device (that’s the way we do here and it works very well).

for the moment i use this one:

Barcode scanner

@Steampunk_Prof
I implement everything, but it still doesn t work.. how do you declare it in node red?
I got this Problem:

picture

Unbenannt

did you drag the node from the sidebar into a flow?

no I can t, the node "barcode-scanner" in the sidebar isn t shown

Ok, as far as I could see, your barcode supports the following interfaces;
"Schnittstelle: RS232, PS2keyboard, USB-Port, etc. "
This means that you can activate the RS232, to do that simply take the Scanner manual, find the barcode for “RS232”, turn on your scanner and scann that code. It will probably make a differnt beep.
After that remove the scanner from the USB port and connect again. You should now see a new deviice inside the “Serial” node-red node.

20180621_145959

and two Output modes : -Keyboard wedge
-serial
this is all what i got to this Topic.. thougt it would be RTS/CTS but with that, nothing happens

Can you post a picture of the page with the “output modes” ?

Ok, as far as I could see your scanner doesn't have a "Setup Mode" barcode so, all you need to do is

-Connect the scanner to a USB port (on your PC or a PI)
-Scann the "Output mode - Serial" (000601)
-Then scann the "Serial BaudRate 19200"
-Then scann the "Serial Handshake - NONE"
-Then scann the "Serial Parity - NONE"

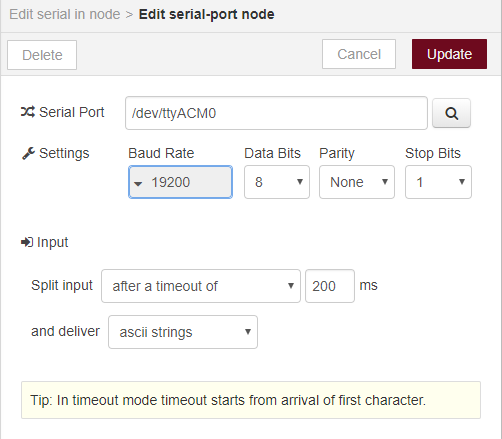
Now open your Node-RED, drop the serial node to the flow and try to configure a new device with the configurations. If it doesn't work paste your Node-RED screen here.

Your serial configuration should be something like this:
image

(The "Serial Port" path maybe vary)

Hope it helps