Hi folks,
I had installed last year a Reolink video doorbell (D340P). Recently Reolink has added webhook support, which I find quite exiting news...
The doorbell in a nutshell
They have a wifi version, but I bought a POE version.
It has been working fine and contains most of the stuff that I want:
- It offers Onvif, so you can use it in Node-RED using my Onvif node.
- You don't need to pay monthly subscription to store your video recordings in the cloud. Not going to pay for my own video recordings that I made with my own camera. Dough

- Optionally you could even put an SD card into it, to store your recordings locally.
- You can push your recordings automatically via ftp on your NAS.
- It is rather affordable, so fortunately I didn't need to sell my kidneys to buy one.
- It contains AI people and vehicle detection. Sometimes a false positive people detected, but I find it quite good.
- And so on...
However I had overlooked one thing: it doesn't contain a relay to activate my existing ding-dong doorbells (like my old classic doorbell button did). So they include the white chime in the box, but I wanted to reuse my existing ding-dong doorbells.
Onvif workaround
Since the doorbell doesn't have a relay inside, I had to use this workaround:
[{"id":"e15689d5095f1f04","type":"switch","z":"bfe334aca9927858","name":"Event?","property":"topic","propertyType":"msg","rules":[{"t":"eq","v":"RuleEngine/MyRuleDetector/Visitor","vt":"str"},{"t":"eq","v":"VideoSource/MotionAlarm","vt":"str"},{"t":"eq","v":"RuleEngine/CellMotionDetector/Motion","vt":"str"},{"t":"eq","v":"RuleEngine/MyRuleDetector/FaceDetect","vt":"str"},{"t":"eq","v":"RuleEngine/MyRuleDetector/PeopleDetect","vt":"str"},{"t":"eq","v":"RuleEngine/MyRuleDetector/VehicleDetect","vt":"str"},{"t":"eq","v":"RuleEngine/MyRuleDetector/DogCatDetect","vt":"str"},{"t":"eq","v":"RuleEngine/MyRuleDetector/Package","vt":"str"}],"checkall":"true","repair":false,"outputs":8,"x":480,"y":120,"wires":[["c64d713bf880d48b"],[],[],[],[],[],[],[]],"outputLabels":["Bezoeker (knop gedrukt)","Video beweging","Cel beweging","Gezicht herkend","Persoon herkend","Voertuig herkend","Hond of kant herkend","Pakket herkend"]},{"id":"a8f7752e.2998f8","type":"onvif-events","z":"bfe334aca9927858","name":"","deviceConfig":"c6b46a46.8067f8","action":"","x":310,"y":120,"wires":[["e15689d5095f1f04"]]},{"id":"748f5110.c57f7","type":"inject","z":"bfe334aca9927858","name":"Start","props":[{"p":"action","v":"start","vt":"str"}],"repeat":"3600","crontab":"","once":true,"onceDelay":"10","topic":"","x":150,"y":120,"wires":[["a8f7752e.2998f8"]]},{"id":"c64d713bf880d48b","type":"function","z":"bfe334aca9927858","name":"Button pressed?","func":"if (msg.property === 'Changed' && msg.data.value === true) {\n node.send(msg)\n}","outputs":1,"timeout":0,"noerr":0,"initialize":"","finalize":"","libs":[],"x":680,"y":80,"wires":[["7fa9e92b642d6049"]]},{"id":"e249237b10d4b3c1","type":"inject","z":"bfe334aca9927858","name":"Simulate button press","props":[{"p":"payload"}],"repeat":"","crontab":"","once":false,"onceDelay":0.1,"topic":"","payload":"{\"id\":123,\"src\":\"testtopic\",\"method\":\"Switch.Set\",\"params\":{\"id\":0,\"on\":true}}","payloadType":"json","x":700,"y":140,"wires":[["7fa9e92b642d6049"]],"info":"Simuleren dat er op de Reolink deurbel knop geklikt is geworden, om de Shelly Switch onafhankelijk te kunnen testen."},{"id":"7fa9e92b642d6049","type":"mqtt out","z":"bfe334aca9927858","name":"Set switch state (via MQTT)","topic":"shellyplus1-d48afc449238/rpc","qos":"","retain":"","respTopic":"","contentType":"","userProps":"","correl":"","expiry":"","broker":"e1a601ccc051bb83","x":960,"y":80,"wires":[]},{"id":"c6b46a46.8067f8","type":"onvif-config","xaddress":"192.168.1.21","port":"80","timeout":"10","checkConnectionInterval":"5","name":"Reolink deurbel"},{"id":"e1a601ccc051bb83","type":"mqtt-broker","name":"","broker":"localhost","port":"1883","clientid":"","autoConnect":true,"usetls":false,"protocolVersion":"4","keepalive":"60","cleansession":true,"autoUnsubscribe":true,"birthTopic":"","birthQos":"0","birthRetain":"false","birthPayload":"","birthMsg":{},"closeTopic":"","closeQos":"0","closeRetain":"false","closePayload":"","closeMsg":{},"willTopic":"","willQos":"0","willRetain":"false","willPayload":"","willMsg":{},"userProps":"","sessionExpiry":""}]
Which has been working fine all time like this:
- Every hour I injected a message to make sure my Onvif node kept listening to Onvif events.
- When an Onvif event arrived, I used a large Switch node to split all different topics, because the doorbell will send messages for all kind of events.
- After some extra checking to only filter the doorbell press events, a message is send via MQTT to a Shelly Switch 1 Plus relay (WIFI).
- The relais closes, so the ding-dong doorbell is activated.
But in my house everything should keep working even when Node-RED is offline, I case I won't be around on this planet anymore... Node-RED is only used to provide some nice extra features, like e.g. voice control. However using this workaround Node-RED needs to be alive, otherwise our doorbell won't work anymore...
Solution via webhooks
Note: a webhook is an HTTP request, triggered by an event in a source system and sent to a destination system, often with a payload of data (which means a POST request).
There were already lots of users asking Reolink to provide a webhook feature, and I joined them with my own feature request. And finally Reolink has added the webhook feature to their doorbell devices firmware ![]()
I am explaining it here, because currently it is not documented yet:
-
In the doorbell web interface navigate to the new feature:
-
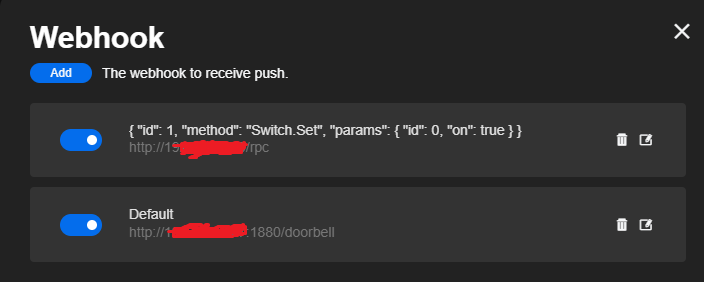
I added 2 webhooks:
-
There is also a "Test" button, so you don't always need to get up from your lazy chair to press the physical button over and over again while experimenting:
When a user presses the doorbell button, the webhook url will be called:
-
For the first webhook the url is
http://<ip_address_shelly_1_switch/rpcand the custom content is{ "id": 1, "method": "Switch.Set", "params": { "id": 0, "on": true } }, which is used to close the Shelly Switch 1 Plus relay. That way the ding-dong doorbell is activated without Node-RED in between:CAUTION: you really need an rpc command request for this, because the standard Shelly api command to close the relay (
http://<ip_address_shelly_1_switch>/relay/0?turn=on) won't work for POST requests. It will on the other hand when you enter it in your browser, because then you will send a GET request... Thanks to @geoffreydemaagd for this tip! -
For the (optional) second webhook the url is
http://<ip_address_node_red>:1880/doorbellto send the same command to Node-RED, in case you would like to do extra stuff when the doorbell button is clicked (or the AI detects a person or vehicle):[{"id":"59ff2a1.fa600d4","type":"http in","z":"bfe334aca9927858","name":"","url":"/doorbell","method":"post","upload":false,"swaggerDoc":"","x":920,"y":400,"wires":[["54c1e70d.ab3e18","c3e8aa6527c9a0ab"]]},{"id":"54c1e70d.ab3e18","type":"template","z":"bfe334aca9927858","name":"page","field":"payload","fieldType":"msg","format":"handlebars","syntax":"mustache","template":"<html>\n <head></head>\n <body>\n <h1>Hello Doorbell</h1>\n </body>\n</html>","x":1090,"y":400,"wires":[["266c286f.d993d8"]]},{"id":"266c286f.d993d8","type":"http response","z":"bfe334aca9927858","name":"","x":1230,"y":400,"wires":[]},{"id":"c3e8aa6527c9a0ab","type":"debug","z":"bfe334aca9927858","name":"debug 2532","active":true,"tosidebar":true,"console":false,"tostatus":false,"complete":"payload","targetType":"msg","statusVal":"","statusType":"auto","x":1110,"y":460,"wires":[]}]When the doorbell button is pushed, the doorbell will send a POST request to the Http-In node. So we send a dummy response (via the Template and Http_out nodes), to make sure the doorbell gets a success message. The debug node shows the following message arriving:
{
    "payload": {
        "alarm": {
            "alarmTime": "2024-12-10T21:01:46.000+0000",
            "channel": 0,
            "channelName": "Reolink Video Doorbell PoE",
            "device": "Reolink Video Doorbell PoE",
            "deviceModel": "Reolink Video Doorbell PoE",
            "message": "Visitor Detected from Reolink Video Doorbell PoE",
            "name":"Visitor Alert",
            "title":"Visitor message",
            "type":"VISITOR"
        }
    }
}
The alarm type will contain information about the event that occurred in the doorbell:
+ "TEST": somebody clicked the "Test" button of the webhook in the web interface.
+ "VISITOR": somebody pressed the physical button of the doorbell.
+ "AI_PEOPLE": The AI has recognized a human on the video footage.
+ "AI_VEHICLE": The AI has recognize a vehicle on the video footage.
Now you can also do other fun stuff with those messages in Node-RED...
Have fun with it!!!
Bart


