Using uibuilder with vite

Hi all,

As a beginner of node-red and uibuilder, I spent few days to understand the webpack by following these links using-uibuilder-with webpack and uibuilder-webpack-wiki. All these articles leads me to a new approach 'Vite'

How uibuilder work:

  1. uibuilder instance src folder: watch files changes and loading automatically
  2. uibuilder instance dist folder: use express to host static index.html
  3. uibuilder front-end lib uibuilder.js contains a wrapper of socket.io-client

Main issue with webpack approach - Cannot debug in development, you have to build first and then check

Main issue with vue/cli created project - the path src(eg src="/index.js") in the dist/index.html is not compatible to uibuilder, you have to change it to (src="index.js") or (src="./index.js").

Main issue with CRA (Create-React-App)created project - difficult or danger to change webpack config directly.

Based on these, there would be another approach: that is using vite for dev and build.

Step 1: use vite to create vue or react application in the project's uibuilder folder. (eg: vue-app)
Step 2: install library "node-red-contrib-uibuilder" and "socket.io-client"
Step 3: run in the development mode. eg: "npm run dev" or "yarn dev"
Step 4: open localhost:3000/vue-app. Attention, must add the folder name in the url end, or there would be socket.io-client invalid namespace issue. This is a trick to handle the url check in the uibuilder.js.

With Step 1 to Step 4, we can already have a fast developing and testing experience.

Step 5: Create format.js and its function is to format the index.html and index.js in the dist folder after build. Change the package.json build script from 'vite build' to 'vite build && node ./scripts/format.js'

After this, you get the well formatted index.html in the dist folder.

For the code behind this, refer the github link.node-red-uibuilder-vite-template
1 Like

Interesting article :+1:

I used something similar with my setup but in my case i used parcel-bundler

I didnt find a use for doing a seperate install in the application folder for uibuilder or for socket-io-client
.. all i did was load uibuilderfe directly from its node-red path. This way i always get a matching version to whatever is installed in NR. I just had to go up a few folders :

import uibuilder from "./../../../node_modules/node-red-contrib-uibuilder/front-end/src/uibuilderfe.js";
uibuilder.start('/navbar', '/uibuilder/vendor/socket.io')

as far socket io, i load it like this:

 <body>
    <div id="app"></div>
    <script src="https://192.168.0.7:1880/uibuilder/vendor/socket.io/socket.io.js"></script>
    <script src="./app.js"></script>
  </body>

this guarantees you always have a matching socketio client / server version .. since its served by uibuilder

the advantage of running a dev server is that it gives you the reload features whenever you make a change in the source files ? but it does complicate things (different port) so i chose to just build the app again with the --watch parameter which more or less does the same. I see that vite has this build --watch command option also.

My parcel script command in package.json is :

"scripts": {
    "dev": "parcel watch ./src/index.html --public-url ./  --no-cache --out-dir ./dist/",
    "build": "rm -rf ./dist/* && parcel build ./src/index.html --no-source-maps --public-url ./  --no-cache --out-dir ./dist/ --detailed-report"
  },

If you want to see my configuration : uib-template-vue-navbar

1 Like

Hi, welcome to the community and thanks for using and contributing to uibuilder :slight_smile:

Yes, I agree. webpack isn't actually that good. However, I've recently done some work with Snowpack and I can say that, not only is it a lot easier to work with, it also DOES work nicely(ish) with Node-RED and uibuilder.

If you have the vNext build of uibuilder installed, you can access the snowpack info from the tech docs. Otherwise, here is the link to the document: node-red-contrib-uibuilder/front-end-build-snowpack.md at vNext · TotallyInformation/node-red-contrib-uibuilder (github.com)

You may also note that this new version of uibuilder has a built-in development capability - though currently only for when you edit code via the Editor, not if you are using VScode or similar (I'll be implementing that for a future release). So ultimately, you won't need a development server such as the one built into webpack or snowpack except for the rebuild part.

Why is that an issue? When working with any web server, you have to specify URL's for resources. Node-RED/uibuilder is actually easier in this respect since you can use the ./index.js relative reference and that will continue to work even if you copy to a new uibuilder node or change the url or turn on/off https.

I don't quite understand - you mean that you have to change the config of webpack from what appears in a tutorial? But that is common anyway isn't it - needing to change the build config to match your deveopment/production environment? Or have I misunderstood?

You will see Vite listed in the front end builds page of the uibuilder tech docs. But I've not used it so can't comment on how well it could be made to work with uibuilder.

To use this method, you have to pass the appropriate start parameters to the uibuilder front-end library. But you probably also have to fix your dependency URL's.

As always, uibuilder tries to ensure that you are not locked out of using your standard web development tools for developing the front-end.

Cool, thanks for sharing that, very useful.

I generally recommend that you at least leave the socket.io client library alone. As you say, you need the matching version for the server. Bundling this really doesn't get you any performance boost and just makes it hard for your build process to track down the correct client version.

This is effective for smaller builds, probably not so much for really complex ones. I'm planning to add the watch feature to uibuilder later this year. If you edit via the Editor, you already get it.

1 Like

Yes .. based on our previous conversations and with the new code .. this is what i do.
the only way i found for Parcel not to bundle it though was to use a full url path (Github issue)

The build is fast with this watch option because i believe it does some caching and only adds to the build the changed code. The second time it runs its instantaneous.

Its good to have the Editor. nice features but i want my luxuries with VSCode :wink:
with some useful plugins for Vue like Vetur, Prettier, Remote SSH, Github integration etc.

Hi UnborN, I checked you repo and indeed we are doing something similar.

I also agree that it is good idea to use the existing library from node-red uib from version control.

I followed your input and use uibuilder.start() with the name space parameter '/vue-app'. I don't need the trick to add it at the end of url.

The point why I wanna running in dev server in another port is to using the VUE(vuex) or REACT dev tool for debugging which I am familiar. The reason why I am not using the 'vite build --watch' option is that I have to format the dist files after build which breaking 'vite build --watch' pattern. Maybe there is another way to do it.

This is not an issue. Neither for vite, nor for uibuilder. Maybe we can describe this an integration tweak. During vite build behavior, the dist/index.html file is generated. The default one is as following:

<!DOCTYPE html>
<html lang="en">
  <head>
    <meta charset="UTF-8" />
    <meta name="viewport" content="width=device-width, initial-scale=1.0" />
    <title>Vite App</title>
    <script type="module" crossorigin src="/index.js"></script>
  </head>
  <body>
    <div id="app"></div>
  </body>
</html>

When we open the web page at localhost:1880/vue-app/. The url for index.js would be interpreted into http get request for "http://localhost:1880/index.js" and would be ended with 404. An error "" would be logged in the console output. If we changed to './index.js' or 'index.js', it will perform http get "http://localhost:1880/vue-app/index.js" and get 304 response. That's reason why a format script is executed after build in my template.

Sorry for the confusion. I am not talking about your webpack tutroial for vue.js. Your tutorial is working and I went through it. It's about the react app created by the create react app. Its webpack config file is not exposed and you have to "npm run eject" and then you can tweak it.

I use this Vue Devtools also .. i understand what you are saying .. but there is a way around it even if you use build --watch you can have the Devtools enabled with a line of code just before your new Vue instance.

// Enable Devtools
Vue.config.devtools = true

new Vue({
 el: "#app",
...

dont know about React

2 Likes

@TotallyInformation @UnborN
There are several modifications on my template, which offer better user experience.

  1. Remove the format script. Instead we specify the base url as './' in the vite.config.js. With this change, we are able to use vite build --watch to update dist folder on any changes. Thanks for @UnborN 's suggestion.
//vite.config.js
export default defineConfig({
...
  base: './'
...
})
// shell 
yarn build --watch
  1. Add legacy brower(vite build base line is Native ESM) support by the plugin @vitejs/legacy-plugin

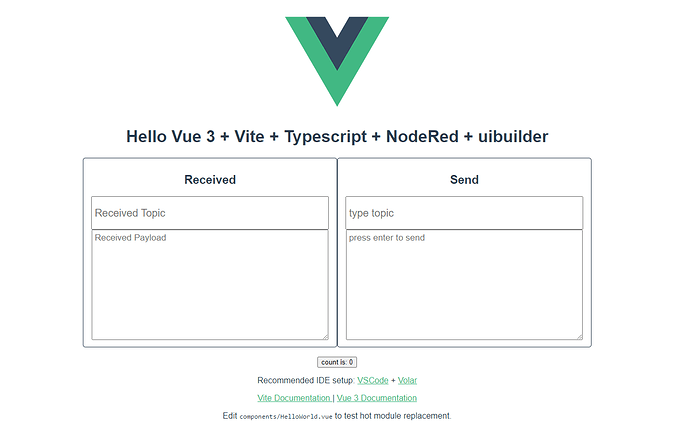
  2. Add a vue3 tempalte - vue3-app. Check this link for more details. In this template. we use the combination of Vue3 + Vite + TypeScript + Uibuilder. All uibuilder related data and method is put in a Vue3 plugin. Data and method is registered vie Vue3 provide and inject pattern. It's convenient to receive message or send message by injection in any component. A hub for all datum. A compact version of vuex instance.

// src/plugin/uibuilderPlugin.ts
export default {
  install: (app: App, options: {nameSpace:string}) => {
    /* our code for the plugin goes here
       app is the result of createApp()
       options is user options passed in. We pass the uibuilder node url here for connection */

    // get nameSpace the same as uibuilder node url. eg: '/vue3-app'
    const { nameSpace } = options;


    // defien the reactive data used for this app
    const reactiveAsyncData = reactive<IData>({
      topic: '',
      payload: '',
      // define more here
    });

    // provide asyncData global
    app.provide('asyncData', reactiveAsyncData);


    // messageHandler
    const messageHandler = () => {
      uibuilder.onChange('msg', (newValue:{topic:string, payload:string}) =>{
        reactiveAsyncData.topic = newValue.topic;
        reactiveAsyncData.payload = newValue.payload;

        // topic logic here
        switch(newValue.topic){

        }
      })
    }

    // start messageHandler
    messageHandler();

    // start uibuilder instance
    uibuilder.start(nameSpace);

    /* send message back to node-red*/
    const send2NR = (topic: string, payload: string):void => {
      console.log(topic, payload);
      uibuilder.send({
        'topic': topic,
        'payload': payload
      });
    }

    /* send control command to node-red*/
    app.provide("send2NR", send2NR);
  }
}

Then in any component we can inject above data and method and use it

// src/components/Hellowolrd.vue
<Script setup lang="ts">
...
  import {inject } from 'vue'
  // inject send2NR method
  const send2NR = inject('send2NR') as (topic:string, payload:string) => void;
  // inject asyncData
  const asyncData = inject('asyncData') as IData
...
</script>
<template>
...
  <input readyonly  type="text" placeholder="Received Topic" v-model="asyncData.topic" />
...
</template>

1 Like

Wow, that looks great :grinning:

I don't suppose you'd like to create a WIKI article with a complete example would you? Alternatively an example external template? That way everyone could benefit.

Why not? I can try to create a wiki page with all the details for everyone. In fact, all the source code is reachable in the github repos node-red-uibuilder-vite-vue3-typescript. I will create a wiki page under the Examples for other frameworks or the VueJS hints? . The title would be Basic Vite Vue3 TypeScript App.

2 Likes

Under the vue section would be good. Title is fine.

Thanks for this.

Double Wow from me also !!

.. thats some pretty advanced vue programming you are using there
Vue plugins, mixing it with Typescript, Vite config .. i tried to follow it from the Github and I understand what you do .. but just the other day i was mixing v-model with v-bind .. and i thought to myself, i have to review the basics.

Excellent work and thanks for sharing

2 Likes

The wiki page Basic Vite Vue3 TypeScript App is added and the entry is added to sidebar under vue section.

2 Likes

That's fantastic, many thanks.

I have made a couple of tweaks though. Mostly a couple of notes and a warning about the socket.io client.

Also, added a comment to your code about passing the namespace to the uibuilder.start function - that this is only required when using the Vite dev server.

One final point, when using Vue2, if you pass Vue's this (the app) to the start function, the uibuilderfe library will know that you are using Vue and it has a couple of extensions. Not sure if those will work with Vue3 and not sure if you wanted to try and include that or make a note to exclude if it doesn't work.

Thanks for notes.

You are right, the namespace is passed only for Vite dev server.

When using Vue 2, In the dist static files, the uibuilder.start(this) would resolve the namespace by the url. But Vue 3 is using Composition API compared to Options API(Options: State | Vue.js) in Vue 2, there is no equivalent of this.

setup(props, context) executed before the component is created

// Arguments
{Data} props
{SetupContext} context

-Lifecycle hooks

import {onMounted, onUpdated, onUnmounted} from 'vue'

const myComponent = {
  setup() {
    onMounted(()=>{ 
      console.log('mounted!') })
    onUpdated(()=>{
      console.log('updated!') })
    onUnmounted(()=>{ 
      console.log('unmounted!') })
  }
}

-Provide / Inject

provide and inject enables dependency injection. Both can be called during setup() with current active instance.

Mapping between Options API Lifecycle Options and Composition API

  • beforeCreate -> use setup()
  • created -> use setup()
  • beforeMount -> onBeforeMount
  • mounted -> onMounted
  • beforeUpdate -> onBeforeUpdate
  • updated -> onUpdated
  • beforeUnmount -> onBeforeUnmount
  • unmounted -> onUnmounted
  • errorCaptured -> onErrorCaptured
  • renderTracked -> onRenderTracked
  • renderTriggered -> onRenderTriggered
  • activated -> onActivated
  • deactivated -> onDeactivated

yes there are significant changes between Vue 2 and Vue3 .. a saw a few tutorials.
one thing that personally was holding me back in using it is, that most major Vue UI component libraries like bootstrap-vue, Vuetify or even individual components like vue-chartjs etc havent yet made the switch to Vue3
so we are kinda stack with Vue 2 (which is still fine for my needs as a Node-red, uibuilder user)

1 Like

Thanks for that. So uibuilder.setup should be in setup at the beginning to be equivalent to the Vue2 examples. However, given the new approach of Vue3, I'm not sure whether the uibuilder start couldn't happen even earlier? I ended up in the created hook because it meant I could be certain that Vue was loaded and running. That meant I could access the Vue internals from within uibuilderfe.

As for the lack of this, I think that this is just a reference to the app anyway - it would be worth seeing if you can pass the app ref into start and see if that just works? I'm just not sure if I've relied on something internal to Vue that has changed in v3.

The good news though is that I've already started working around some of the Vue integrations as I've improved my front-end knowledge and worked out how to do things natively. The toast notifications being a good case in point. The original requires both Vue and bootstrap-vue and that is still there, but there is now also a native version that does the same job.

It could happen earlier. You can put it in a plugin. Let the Vue3 app instance use this plugin before the Vue instance is mounted in the main.js.

// src/main.ts
import { createApp } from 'vue';
import App from './App.vue';
import uibuilderPlugin from './plugin/uibuilderPlugin';

// create the Vue3 instance
const app = createApp(App)

// use uibuilderPlugin
app.use(uibuilderPlugin, {'nameSpace': '/vue3-app'});

// mount app
app.mount('#app')

In Vue3, you can also get the app instance by getCurrentInstance()in setup(). But it's not equivalent of this.

import { getCurrentInstance } from 'vue'
const myComponent = {
  setup() {
    // get the instance
    const internalInstance = getCurrentInstance()
   // access instance properties
   internalInstance.appContext.config.globalProperties // access the globalProperties
  }
}
1 Like

I totally agree that there is lack of support of Vue 3 for many libraries. In most cases, Vue 2 and its eco-system is enough for our dashboard application.

Thanks for the clarification. At least I now know some of the things to look out for. To be honest, I'll have to have a think about whether to remove the Vue specific stuff in a future release. I think the current code is too tightly bound and it really needs bootstrap-vue as well as vue.

We have a working example for Vue3 so that's good and probably enough for now. At some future point, I'll need to learn v3 and do some more work.

Thanks again for your help and input.