Need Help with Customizing Button Size in Node-RED UI Dashboard Notification Node

Hello everyone,

I've been working with the UI dashboard module in Node-RED and using the notification node in the OK/Close mode. I was able to send HTML code to modify the font size within the notification, and that worked just fine. However, I've run into an issue that I can't seem to overcome.

The button within the notification is still too small, and I've been unable to change its size. I tried various CSS tricks and looked through the documentation, but so far, no luck in resizing the button.

Here's a snippet of the JS code I used to change the font size:

var text = msg.error_text; 
var heading = "Error Slot: " + msg.test_ch; 
var fontSize = "40px"; 
var headingSize = "60px"; 

var html = `
  <div style="text-align: center;">
    <h1 style="font-size: ${headingSize};">${heading}</h1>
  </div>
  <div style="font-size: ${fontSize};">
    ${text}
  </div>
`;

msg.payload = html;
return msg;

I've been looking to change the button size to match the font, but I'm stuck.

If anyone has encountered this problem before or knows how to resize the button within the notification node, your guidance would be much appreciated.

Thank you in advance!

Welcome to the forum @ElectronB

Here is my first attempt:
Untitled 1

It probably shouldn't use pixel sizes and I ought to give my notification a custom class "bigbutton" so the CSS would apply to (eg) .bigbutton .md-dialog-actions.

Your way of changing font size with javascript seems strange to me, I'm not a native speaker of javascript but it clearly works for you. :grinning:

1 Like

Hi Jbudd,

Many thanks for your help, but I feel a little bit stupid at the moment. I'm an embedded developer, and I normally write in C, so web development and CSS are something I'm not familiar with.

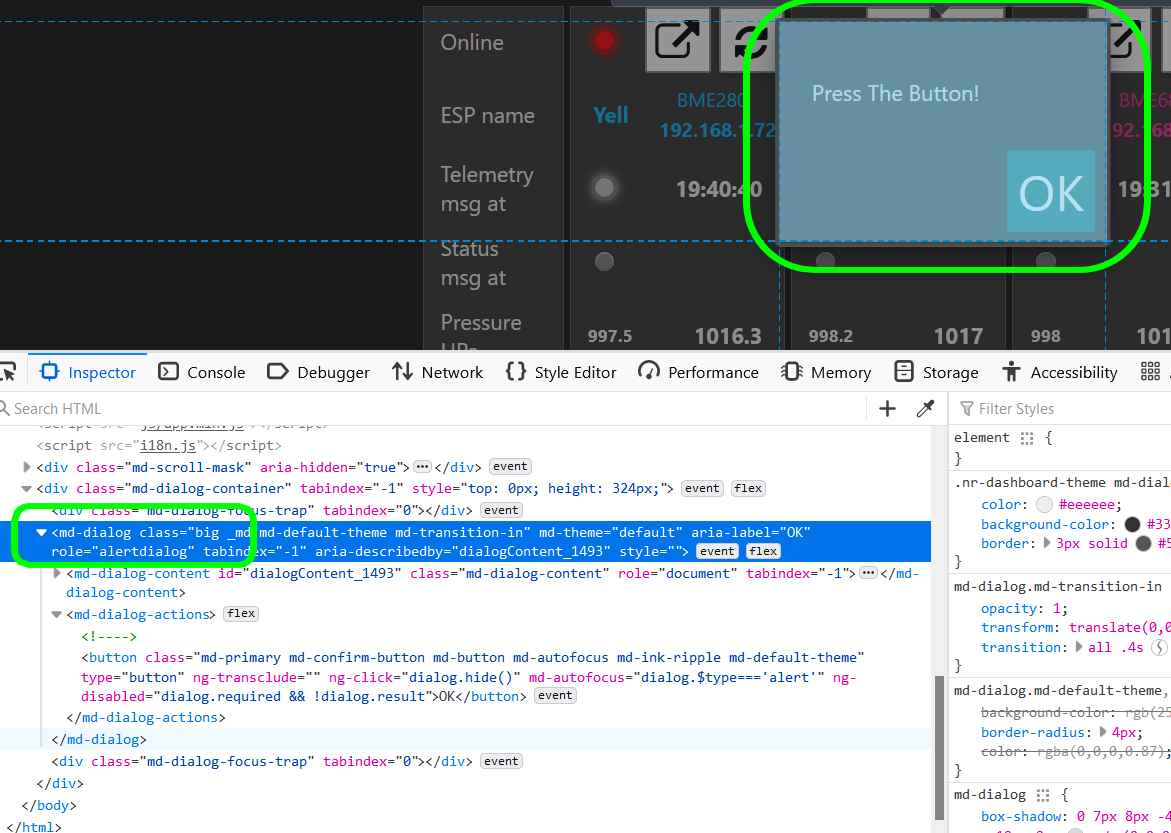
What I tried was this, and for me, it does not work. The button stays small. I tried to give the CSS style a name "md-confirm-button-big," and using Chrome dev tools, I can see it's been added to the md-dialog, but not to the button itself.

Here's the snippet I tried:

[
    {
        "id": "d71d2bf22311acea",
        "type": "ui_toast",
        "z": "0ef073495d82c7ba",
        "position": "dialog",
        "displayTime": "10",
        "highlight": "red",
        "sendall": false,
        "outputs": 1,
        "ok": "Close",
        "cancel": "",
        "raw": false,
        "className": "",
        "topic": "",
        "name": "",
        "x": 830,
        "y": 1200,
        "wires": [
            []
        ]
    },
    {
        "id": "184962b1f978f633",
        "type": "function",
        "z": "0ef073495d82c7ba",
        "name": "Gen Error Message",
        "func": "var text = msg.error_text; \nvar heading = \"Error Slot: \" + msg.test_ch; \nvar fontSize = \"40px\"; \nvar headingSize = \"60px\"; \n\nvar html = `\n  <div style=\"text-align: center;\">\n    <h1 style=\"font-size: ${headingSize};\">${heading}</h1>\n  </div>\n  <div style=\"font-size: ${fontSize};\">\n    ${text}\n  </div>\n`;\n\nmsg.payload = html;\nreturn msg;\n",
        "outputs": 1,
        "noerr": 0,
        "initialize": "",
        "finalize": "",
        "libs": [],
        "x": 450,
        "y": 1200,
        "wires": [
            [
                "80ea0196093473f6"
            ]
        ]
    },
    {
        "id": "a57e3825b242b6bd",
        "type": "inject",
        "z": "0ef073495d82c7ba",
        "name": "",
        "props": [
            {
                "p": "error_text",
                "v": "110 V Start Fail, P=0.15W S=0.44VA",
                "vt": "str"
            },
            {
                "p": "test_ch",
                "v": "3",
                "vt": "str"
            }
        ],
        "repeat": "",
        "crontab": "",
        "once": false,
        "onceDelay": 0.1,
        "topic": "",
        "x": 250,
        "y": 1200,
        "wires": [
            [
                "184962b1f978f633"
            ]
        ]
    },
    {
        "id": "80ea0196093473f6",
        "type": "ui_template",
        "z": "0ef073495d82c7ba",
        "group": "52cfcdf95b9d7e0a",
        "name": "confirm",
        "order": 34,
        "width": 0,
        "height": 0,
        "format": "<style>\n    .md-dialog-actions{\n        height: 120px;\n    }\n    .md-confirm-button-big{\n    height: 100px;\n    width: 400px;\n    font-size: 40px;\n    }\n</style>",
        "storeOutMessages": true,
        "fwdInMessages": true,
        "resendOnRefresh": true,
        "templateScope": "global",
        "className": "",
        "x": 660,
        "y": 1200,
        "wires": [
            [
                "d71d2bf22311acea"
            ]
        ]
    },
    {
        "id": "52cfcdf95b9d7e0a",
        "type": "ui_group",
        "name": "Control",
        "tab": "903badc4944c48df",
        "order": 1,
        "disp": true,
        "width": "5",
        "collapse": false,
        "className": ""
    },
    {
        "id": "903badc4944c48df",
        "type": "ui_tab",
        "name": "Testen",
        "icon": "dashboard",
        "order": 1,
        "disabled": false,
        "hidden": false
    }
]

Demo Video

I must be missing something fundamental here. If you have any further insights or guidance, I would really appreciate it.

Thanks again!

The CSS in the template "confirm" does not need to be wired into the flow. It's surprising but this works without a message flowing through it.
Untitled 2

You can give the dialog node a custom class - there is a field for it in the node config. So for example put big in this field.

The class is applied to the widget as a whole. In this case: <md-dialog class="big" ...

Within the widget is <button class="md-primary md-confirm-button md-button (etc)">

md-confirm-button sounds like it's going to be a suitable target for styling. It's a class within class "big"
So in my CSS template I have

<style>
 .big .md-confirm-button{
    height: 60px;
    font-size: 36px;
    }
</style>

(ie a class "md-confirm-button" within a class "big")

My initial styling of .md-dialog-actions was a) wrong, b) ignored by the browser and c) unnecessary, so my little flow is now this:

[{"id":"966baf4ffed13e18","type":"ui_toast","z":"68e4f8b66ca3dee4","position":"dialog","displayTime":"3","highlight":"","sendall":true,"outputs":1,"ok":"OK","cancel":"","raw":false,"className":"big","topic":"","name":"","x":430,"y":200,"wires":[[]]},{"id":"ea1fdbfb8325ed85","type":"inject","z":"68e4f8b66ca3dee4","name":"","props":[{"p":"payload"},{"p":"topic","vt":"str"}],"repeat":"","crontab":"","once":false,"onceDelay":0.1,"topic":"","payload":"Press The Button!","payloadType":"str","x":230,"y":200,"wires":[["966baf4ffed13e18"]]},{"id":"8bbe210dd8fd10ad","type":"ui_template","z":"68e4f8b66ca3dee4","group":"be8cd6b09a8d7d5d","name":"confirm","order":13,"width":0,"height":0,"format":"<style>\n .big .md-confirm-button{\n    height: 60px;\n    font-size: 36px;\n    }\n</style>","storeOutMessages":true,"fwdInMessages":true,"resendOnRefresh":true,"templateScope":"global","className":"","x":440,"y":140,"wires":[[]]},{"id":"be8cd6b09a8d7d5d","type":"ui_group","name":"Labels","tab":"704020d306ae5506","order":1,"disp":false,"width":2,"collapse":false,"className":""},{"id":"704020d306ae5506","type":"ui_tab","name":"ESP BME","icon":"dashboard","order":1,"disabled":false,"hidden":false}]
1 Like

From your video (thanks, nicely done) : "Any idea why the font shows larger then smaller again"?

Well, not really but I suspect that you are trying to do too much in HTML and/or javascript rather than modifying the default Node-red behaviour.

All I have done is to add a class to the widget and some CSS to style the button. No HTML, no scripts.
My OK button does not switch from large to small.

1 Like

Hi Jbudd,

Thank you so much, that solves one of my last problems! I've built a testing device with Node-RED for my first electronics, which can now be produced. I only have one place where I really use CSS, and that's the button. Besides that, I have two template nodes in use, one to display a log, and one to embed an oscilloscope in an iframe. The whole system runs on several Python server apps, which are controlled by Node-RED's TCP.

I'm handing over the tester to production today, and the day after tomorrow, I'm off on vacation. I'm thrilled! One point I'd like to improve on the tester is the use of WebGL for the oscilloscope, as the Raspberry Pi 4 isn't rendering the page quickly enough, leading to the RAM filling up.

Thanks again for all your help.

Best regards,
ElectronB

P.S. Enjoying some well-earned time off, knowing that this key project is completed, is a great feeling. Thanks for being part of it!

P.P.S. As a small token of my appreciation, I've attached some images of the testing device and the whole setup. It's unnecessary, but I wanted to share it with you as a thank you for all your guidance. Enjoy!

Some Images as PDF :slight_smile:

3 Likes

This topic was automatically closed 14 days after the last reply. New replies are no longer allowed.