D2 Mobile - Home Controller in my pocket

I've been wanting to have a mobile only dashboard for some time yet the core dashboard's needed for my PC screen. While I can access it via mobile or tablet, it's just too much for those screens. D2 allowed me to create a mobile only dash with just the key elements I wanted.


The top portion is all about controlling my music. I am a serious music enthusiast and have speakers throughout the home (and the elevated deck ,the patio and garage). I run a separate rpi3 running a Volumio (dedicated) image located at my music center. It provides a stereo feed to a VOX switch I made so that if my Home Controller needs to say something while music is playing, she takes over until she's said her piece. I can play either streamed (IP) or local library music. I just needed to control it from whereever I was.

While I do control Volumio via NR (rest commands) for volume, next track etc.. I access that rpi3 directly to change music source (not part of the D2 mobile dash). Here it is from my phone, it suits the need very well.

The next section below gives me control over the Cepstral text-to-speech voice that does all the talking. I can set volume from wherever I am, even enter text that will be spoken over the house speakers ("dinners ready"), or l can click a button to have the last voice msg repeated that I didn't quite get the 1st time. Quiet Time is part of Home Controller which defines when it is not allowed to make a sound. I can set on - off times here in this app or on my main NR screen. Force Amp off is for when I need to prevent voice msgs for a short period (on the phone).

Next is weather related items. My Home Controller will announce all weather alerts however here I can call for a long or short range forecast, or just the current temperature.

And the bottom portion gives me control over the alarm system I created with NR.

There is more I'll add, already have a 2nd screen started, but you get the idea of how I'm using it. Love this flexibility.

EDIT: Forgot to mention the solar section.
D2 Solar
This allows me to see at a glance the state of my solar charger, how much of a charge has occurred that day, and to even force the AC (supplemental) charger to take over if necessary. Just awesome.

4 Likes

Very nice - although a lot will be specific to your setup it would be nice to post up some of the flows for beginners (on D2) such as myself to learn from

Craig

Fair enough. Both core dashboard and D2 offer significant opportunity to customize them. To take advantage of this you really need two things (these will also open an enormous new world for you in NR, well worth knowing):

  1. a modest understanding of javascript so you can write custom code in a function node; and
  2. a modest understanding of HTML.

Here is a simple flow I created for you that you can use / modify to get started.

Here is the result:
Button Light

Here is the flow (copy and IMPORT to your NR editor):
NOTE: You'll have to change the group in the button node to suit your dashboard setup)

[
    {
        "id": "50b200359c4c402a",
        "type": "function",
        "z": "37226bbddff3ddf4",
        "name": "Control",
        "func": "/*  Example of how to customize a dashboard button */\n\n// set up some variables we'll need\nvar icon = '<i class=\"fa fa-power-off\" ></i>';    // from font awesome, check out their website\nvar backColor, state, text = \"Light is now \";     \n\n// make sure we have context (variable in memory) to use (this won't exist until 1st run)\nif (typeof ( context.get(\"state\") ) === 'undefined') context.set(\"state\", 'OFF' );  // initial state will be OFF\n// now call the context variable so we know last state of the button\nstate = context.get(\"state\");\n\n// when the button is clicked it sends 'toggle' as a payload\nif (msg.payload === 'toggle' && state === 'OFF') { \n   state = 'ON';          // change OFF to ON\n   backColor = 'green';   // change button background color\n   node.status({fill: backColor, shape:\"dot\", text:\"ON\"});       // this appears on the bottom of the function node\n } \n else if  (msg.payload === 'toggle' && state === 'ON') {\n   state = 'OFF';\n   backColor = 'red';\n   node.status({ fill: backColor, shape: \"ring\", text: \"OFF\" });  // this appears on the bottom of the function node\n} \n\ncontext.set(\"state\", state);   // have to store the new state of the button in context\n\nvar button_label = { icon: icon, state: text + state, backColor: backColor }; // this determines how the button looks\nmsg = { payload: text + state };  // this we would send to a node to control something. Could just send 'state'\n\nreturn [ button_label, msg ]; // button_label goes out 1st output (top), msg on the 2nd output",
        "outputs": 2,
        "timeout": 0,
        "noerr": 0,
        "initialize": "",
        "finalize": "",
        "libs": [],
        "x": 820,
        "y": 440,
        "wires": [
            [
                "d0c20c98cb06f6fc"
            ],
            [
                "7b9f55a8499d4044"
            ]
        ],
        "outputLabels": [
            "Button Label",
            "Msg (control)"
        ]
    },
    {
        "id": "d0c20c98cb06f6fc",
        "type": "ui_button",
        "z": "37226bbddff3ddf4",
        "name": "Button",
        "group": "c768b8a5.d1b078",
        "order": 11,
        "width": 0,
        "height": 0,
        "passthru": false,
        "label": "{{msg.icon}} {{msg.state}}",
        "tooltip": "",
        "color": "",
        "bgcolor": "{{msg.backColor}}",
        "className": "",
        "icon": "",
        "payload": "toggle",
        "payloadType": "str",
        "topic": "topic",
        "topicType": "msg",
        "x": 970,
        "y": 433,
        "wires": [
            [
                "50b200359c4c402a"
            ]
        ]
    },
    {
        "id": "7b9f55a8499d4044",
        "type": "debug",
        "z": "37226bbddff3ddf4",
        "name": "debug 7",
        "active": true,
        "tosidebar": true,
        "console": false,
        "tostatus": true,
        "complete": "payload",
        "targetType": "msg",
        "statusVal": "payload",
        "statusType": "auto",
        "x": 978,
        "y": 500,
        "wires": []
    },
    {
        "id": "c768b8a5.d1b078",
        "type": "ui_group",
        "name": "System Information",
        "tab": "dd0575f8.a12198",
        "order": 1,
        "disp": true,
        "width": "7",
        "collapse": false,
        "className": ""
    },
    {
        "id": "dd0575f8.a12198",
        "type": "ui_tab",
        "name": "Computer System Status",
        "icon": "computer",
        "order": 7,
        "disabled": false,
        "hidden": false
    }
]

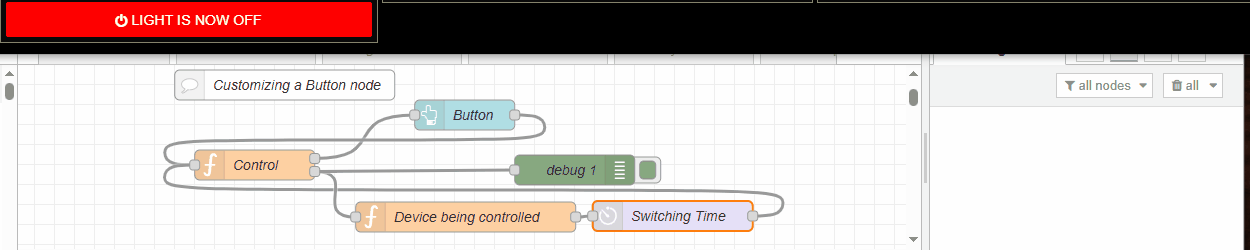
Just so you know, changing the switch label (view) directly from a click is bad form because you just changed the UI to a new state but how do you know for certain the device under control actually switched and is now in that state?

Here is a slightly modified flow that waits for the switch (device) to acknowledge it changed state and using that confirmation to change the switch view.

The delay node mimics network and switch transition times.
The lower function node is pretending to be the device under control.
Button Light2

    {
        "id": "50b200359c4c402a",
        "type": "function",
        "z": "37226bbddff3ddf4",
        "name": "Control",
        "func": "/*  Example of how to customize a dashboard button */\n\n// set up some variables we'll need\nvar icon = '<i class=\"fa fa-power-off\" ></i>';    // from font awesome, check out their website\nvar backColor, state, text = \"Light is now \";     \n\n// make sure we have context (variable in memory) to use (this won't exist until 1st run)\nif (typeof ( context.get(\"state\") ) === 'undefined') context.set(\"state\", 'OFF' );  // initial state will be OFF\n// now call the context variable so we know last state of the button\nstate = context.get(\"state\");\n\n// manage each button click, change the command to send out based on what it was before ON>OFF  OFF>ON \nif (msg.payload === 'toggle')  {\n//state = (if this is true) ?  this : else this   \n  state = (state === \"ON\")  ? \"OFF\" : \"ON\";\n  msg = {payload: state};\n  return [null, msg];          } // don't change the button label ... yet \n// we need to wait for the device to tell us it has switched states\n// so manage the message we receive back from the device under control\nif (msg.payload === \"I turned ON\")  { // if the message from the device is \"ON\"\n   state = 'ON';          // set the state appropriately\n   backColor = 'green';   // change button background color\n   node.status({fill: backColor, shape:\"dot\", text:\"ON\"});       // this appears on the bottom of the function node\n } \nif (msg.payload === \"I turned OFF\") { // if the message from the device is \"OFF\"\n   state = 'OFF';\n   backColor = 'red';\n   node.status({ fill: backColor, shape: \"ring\", text: \"OFF\" });  // this appears on the bottom of the function node\n} \n\ncontext.set(\"state\", state);   // have to store the new state of the button in context\n\n// now we onlly need to update the button label\nvar button_label = { icon: icon, state: text + state, backColor: backColor }; // this determines how the button looks\nreturn [ button_label ]; // button_label goes out 1st output (top), msg on the 2nd output",
        "outputs": 2,
        "timeout": 0,
        "noerr": 0,
        "initialize": "",
        "finalize": "",
        "libs": [],
        "x": 820,
        "y": 460,
        "wires": [
            [
                "d0c20c98cb06f6fc"
            ],
            [
                "986ad0340526ab9e",
                "8febe460e2434f9b"
            ]
        ],
        "outputLabels": [
            "Button Label",
            "Msg (control)"
        ]
    },
    {
        "id": "d0c20c98cb06f6fc",
        "type": "ui_button",
        "z": "37226bbddff3ddf4",
        "name": "Button",
        "group": "c768b8a5.d1b078",
        "order": 11,
        "width": 0,
        "height": 0,
        "passthru": false,
        "label": "{{msg.icon}} {{msg.state}}",
        "tooltip": "",
        "color": "",
        "bgcolor": "{{msg.backColor}}",
        "className": "",
        "icon": "",
        "payload": "toggle",
        "payloadType": "str",
        "topic": "topic",
        "topicType": "msg",
        "x": 1030,
        "y": 410,
        "wires": [
            [
                "50b200359c4c402a"
            ]
        ],
        "inputLabels": [
            "label info"
        ],
        "outputLabels": [
            "toggle "
        ]
    },
    {
        "id": "3a97f5bfb735b522",
        "type": "comment",
        "z": "37226bbddff3ddf4",
        "name": "Customizing a Button node",
        "info": "",
        "x": 850,
        "y": 380,
        "wires": []
    },
    {
        "id": "2538fbb9bcf9d643",
        "type": "delay",
        "z": "37226bbddff3ddf4",
        "name": "Switching Time",
        "pauseType": "delay",
        "timeout": "1250",
        "timeoutUnits": "milliseconds",
        "rate": "1",
        "nbRateUnits": "1",
        "rateUnits": "second",
        "randomFirst": "1",
        "randomLast": "5",
        "randomUnits": "seconds",
        "drop": false,
        "allowrate": false,
        "outputs": 1,
        "x": 1238,
        "y": 511,
        "wires": [
            [
                "50b200359c4c402a"
            ]
        ],
        "inputLabels": [
            "Input"
        ],
        "outputLabels": [
            "Machine Delay"
        ]
    },
    {
        "id": "986ad0340526ab9e",
        "type": "function",
        "z": "37226bbddff3ddf4",
        "name": "Device being controlled",
        "func": "// This node pretends to be a switch being commanded to turn on or off\n// This might be a SONOFF switch as example\n\n/* Code explanation:                        true?             false? \nvar response =   (is this true)       ? response = this   else response = this      */\nvar response = (msg.payload === \"ON\") ? \"I turned ON\" : \"I turned OFF\";\nnode.status({text: response});  // show ode status\nreturn {payload: response};     // now return the device response",
        "outputs": 1,
        "timeout": 0,
        "noerr": 0,
        "initialize": "",
        "finalize": "",
        "libs": [],
        "x": 1031,
        "y": 512,
        "wires": [
            [
                "2538fbb9bcf9d643"
            ]
        ],
        "inputLabels": [
            "ON OFF Commands"
        ],
        "outputLabels": [
            "My current state"
        ]
    },
    {
        "id": "8febe460e2434f9b",
        "type": "debug",
        "z": "37226bbddff3ddf4",
        "name": "debug 1",
        "active": true,
        "tosidebar": true,
        "console": false,
        "tostatus": false,
        "complete": "false",
        "statusVal": "",
        "statusType": "auto",
        "x": 1140,
        "y": 465,
        "wires": []
    },
    {
        "id": "c768b8a5.d1b078",
        "type": "ui_group",
        "name": "System Information",
        "tab": "dd0575f8.a12198",
        "order": 1,
        "disp": true,
        "width": "7",
        "collapse": false,
        "className": ""
    },
    {
        "id": "dd0575f8.a12198",
        "type": "ui_tab",
        "name": "Computer System Status",
        "icon": "computer",
        "order": 7,
        "disabled": false,
        "hidden": false
    }
]```
1 Like