It is combination of box-shadow with inset, matching border colors and background colors

Like @Sean-McG I also use some PZEM-004T units connected to a Wemos D1 Mini running Tasmota to monitor energy consumption. Really easy to implement and gives fairly accurate results via MQTT to NR.
Hi, can you give a few more hints ![]() I meticulously typed all that into a template node (minus the funny squares) and... nothing, doesn't even format in the node the same. Apparently, and as to be expected, I am doing something wrong
I meticulously typed all that into a template node (minus the funny squares) and... nothing, doesn't even format in the node the same. Apparently, and as to be expected, I am doing something wrong ![]()
Did you surround all the CSS with style tags?
<style>
  /* hotnipi's CSS here*/
</style>
There is many threads about dashboard CSS, do search those therms.
Nope, I forgot all about that ![]()
Thanks for the reminder of the term. I can barely spel CSS, let alone use it on my own, but I am getting better as finding the correct words to search/ask for ![]() And your link and example helped immensely
And your link and example helped immensely ![]()
Sonoff + PZEM-004T cost about the same as Sonoff POW version. Any reason of not using it instead?
None - except I had a set of ten Wemos D1 Minis in stock.


D1 mini gives me more inputs / outputs for other things, so it can reduce the number of wifi devices needed.
Here are my dashboard pages on my RPI3 with Raspberry touch screen in the living room.
Its been serving us wel for the last 3 years and ones in a while gets a small modification.

The home page shows a rain radar image and describes the weather for today.
It has 2 buttons and 2 graph-bars. The first button brings you to the switch page where you can control all the lights in the house and the second brings you to the charge page of our electric vehicle.
The 2 bar-graphs indicate how many KW's the house and the car take at the moment.

On the switch page we can also operate the garage door and we have a button for all lights upstairs and all lights down stairs.

The charge page is still a work in progress, the idea is to communicate to the car and read the SOC and SOH.

A more detailed weather page

We used to have some network problems. If any of the above was missing, the RPI would show this page and this would help me trouble shoot.
It ended up being the network switch that caused problems.
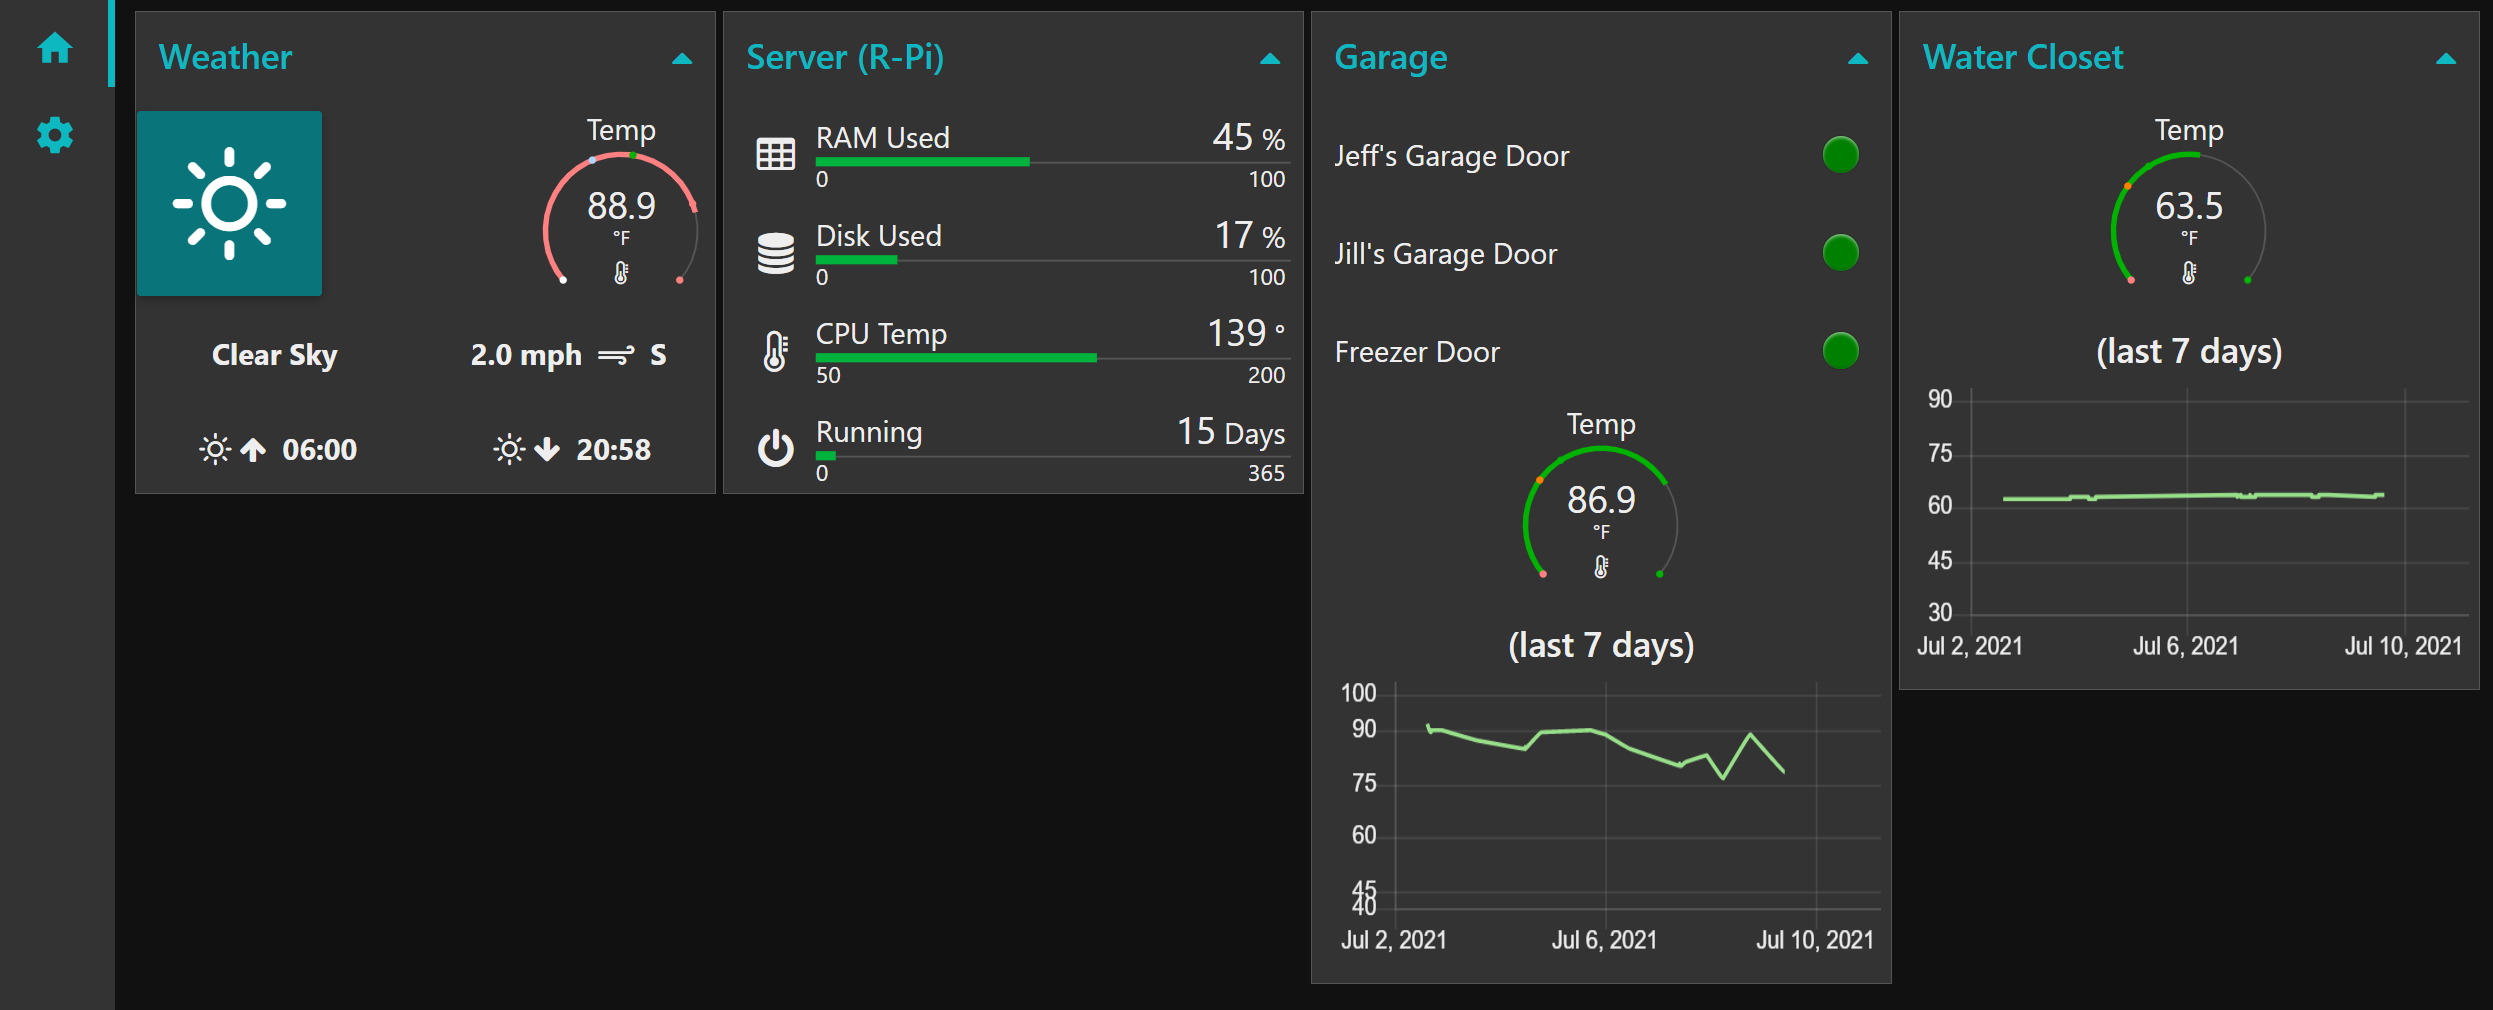
A simple dashboard showing status of garage doors and freezer door and a few other items. I also have Alexa alerts built in as well. For example, if the freezer door is left open for more than two minutes, Alexa will broadcast an announcement on every device in the house every two minutes until it's closed. This has happened twice since I first set it up.I also get notifications on my phone using Pushover.

I love seeing all the other examples here... great stuff!
Congrats!
I have been looking for the influx erase data!, could you help at least with the core sql?
thank you
Hi, my turn!
Here is M-Track Reloaded, a Node-Red application that controls my vintage Märklin model railway. The railway runs on a 3 rail system with 16V AC current, all accessories are solenoid or motor driven. This is a zero code dashboard, it only uses standard NR nodes and their parameters.
I have designed ESP8266 boards to operate all accessories, they run a tasmota firmware which are in turn controlled with node-red via MQTT. The solution runs on a Raspberry Pi 4 in headless configuration, I use my iPad to access the Dashboard.
The accessories are simply plugged into the boards with no modification required, the solution basically replaces a series of physical custom switch boxes and the associated wiring with a wifi based solution. As I change things constantly, I paid particular attention to the change aspect of the operations. I have no internet access where the layout is, so everything needed to be accessible from the dashboard.
I aimed to remain as close as possible to the analogue look and feel of the vintage Marklin system I use, starting with the color scheme, but also with the same logic used to add or remove accessories. I also added a few 21st century touches here and there.
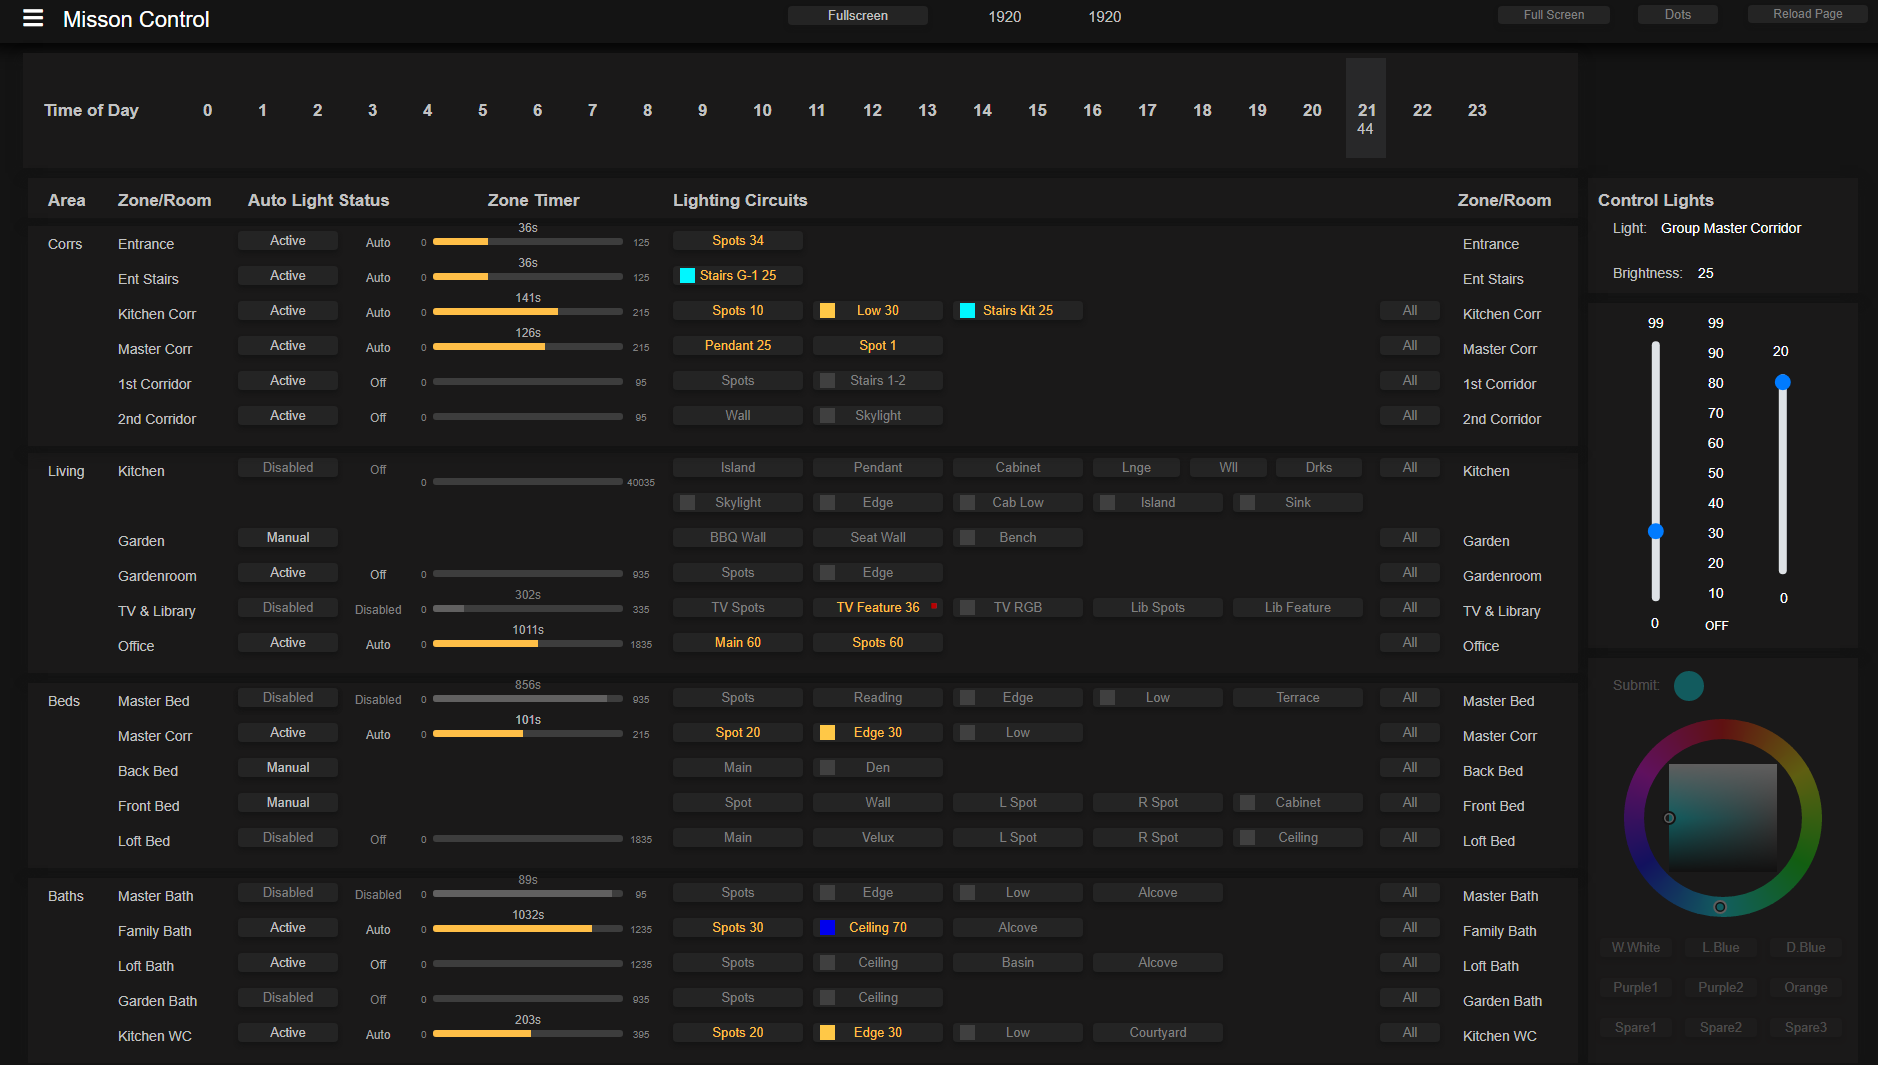
Here is the "Signal Box" page where I control turnouts, signals, lights and uncouplers, the dashboard will only show configured items. I can set the layout to automatic or manual mode from there too. Automatic will activate a series of tracks used to trigger accessories when the trains go over them, manual disables the special tracks and sets all signals to stop.

Here is the settings page. This is where I configure what is on the signal box page, any new ESP8266 board appears in a list as soon as it is on the network, I can tap a menu next to its name to start a configuration flow that will allocate it to one of the functions in the application and set the ESP8266 GPIOs/hardware settings to the right value.

I can automatically set a series of turnout and signals using routes, this function has its own tab called "Route", activating a route will activate the accessoires in a sequence leaving a little delay between steps to avoid overloading the AC transformers used to power them.

I can configure new routes or delete existing ones form this tab too...
Creating a new route

Picking actions for the route

Deleting a route

Then we have a yard tab, this is where I have functions for the remote controlled turntable and cranes:
The Yard tab with basic controls

There is also an advanced mode for the turntable, that will automatically move its bridge to a chosen position (no sensors involved, just maths and timing to trigger the current pulses required to move):

The cranes have a preset function that will execute a series of actions to automatically move/lift them.
Finally, we have hardware tab where I can flash ESP8266 boards, remove them or perform troubleshooting tasks... Flashing a board will upload a firmware to the esp8266 and restart it, from that point the board will automatically join the network and become available for allocation.

... and a power tab, used to power down the Pi4 gracefully or restart the dashboard.

If you' d like to see the layout in action, here is an example in automatic mode:

And here are a few links to playlists related to the application:
- The initial development, this is a bit dry and the first ever youtube videos I made

- Some short feature overviews
Who's next?


Lots of nice dashboards here. Throwing mine into the ring. We use Node-RED to access and monitor our amateur radio club SDR radios. Here is our dashboard with the radio client underneath in Receive mode:

Here is the dashboard with the radio client underneath in Transmit mode:

The radio is currently using a Digital Mode of communications (FT-8) which was developed at Princeton University. The dashboard allow us to remotely access the radio and monitor it's environment. In addition we have two beam antennas that we can control the azimuth bearing.
Hey Guys,
I started building with NR in July/Aug last year and stopped in early Feb this year due to work commitments. I think it's the best home automation environment to develop on out there.
The fact that you can literally build anything you want off the back of it and the GUI/node based interface allows you to compartmentalise your code into nice little modules, means for me, that it's the best way to code, full stop. Gone are the days of massive complicated scripts that are near impossible to debug, and with v2 of NR with v1 of the debugger, things are only getting better!
I started building with the dashboard nodes last year, which are the first three images. They are fairly bland looking pages, but hugely functional for me at the time (a dream come true of sorts) as I could for the first time see my whole house in one place!
However I wanted more flexibility than the dashboard nodes and the grid layout could provide, so I started to dabble with uibuilder in Sep last year, which of course once you start, you can't stop. It provides complete flexibility to build literally anything you want.
Built using Dashboard Nodes:
Heating Panel - Dashboard Nodes
Heating engine was still running on LUA at the time, with this being a NR dashboard-node interactive interface to control the heating.

Lighting Panel - Dashboard Nodes
Lighting solution running on LUA at the time, with this being a NR dashboard node interactive interface to control the lighting.

Key Sensor Status - Dashboard Nodes
Simple dashboard to tell me if there are any issues with sensor reporting
Unfortunately I never took an image of it with the colour coding / error reporting and I've since decommissioned all my dashboard-node dashboards in favour of uibuilder.

Built Using uibuilder:
Floorplan - uibuilder
My first project in uibuilder - thanks to lots of support, especially @UnborN, I got it to work!
There's lots of layers in the web page you can't see or can't readily see e.g. animations when you click on things, timers telling you how many seconds before automated lighting will turn off.

Hot Water - uibuilder
This was my second project in NR. I built my instant hot water system to run fully from NR. From Nov/Dec last year all the hot water in the house was and still is running/being provided for by NR.

Heating Panel 1/3 - uibuilder
This was my third NR project and I also fully moved all my heating to NR, so now the whole system is built with NR and uibuilder. All the LUA code has been decommissioned.
From Jan this year all my heating has running fully from NR, without a hiccup along the way.
There are more layers e.g. pop-ups that appear when you click certain parts of the UI.

Heating Panel 2/3 - uibuilder
This is an interface for configuring each zone. it provides full flexibility to configure each zone to the exact spec required to maintain comfort throughout winter, no matter if it's 14C outside or -4C outside.

Heating Panel 3/3 - uibuilder
This is a whole house scheduler view to see when heating is on/off and at what temp level

Lighting - uibuilder
This is the migration of my lighting dashboard from the NR dashboard-nodes to uibuilder.
I still have to build out a full solution for lighting on NR / uibuilder.

WHat did you use for that Andrew - OpenWeather Map or BOM?
Craig
Wow - that is some impressive work in there - i keep looking at all the work Julian has doen on UiBuilder and i am in awe of where he finds the time !
Craig